

Explore our new Cybersecurity Terms Glossary, explained by our experts.

Explore our new Cybersecurity Terms Glossary, explained by our experts.
Cybersecurity Terms Glossary
Nmap is an open-source network scanner. Part 1 covers its scan phases, installation on Linux and Windows, and host discovery options from list scans to SYN, ACK, UDP, and ARP pings.

What Is Nmap? Basic and Advanced Usage – Part 1
Nmap is an open-source tool for network scanning and vulnerability discovery. It can scan large numbers of systems and returns flexible, fast, and meaningful results: whether hosts are up, the state of their ports, which services are running, and which operating system they use. You can also find out whether the services Nmap detects contain known vulnerabilities. Its built-in scripts go further still, producing detailed information about a target and checking it for security weaknesses. Nmap is widely regarded as one of the best tools in its field.
For a scan to succeed, Nmap works through a defined sequence of phases.
Nmap includes scripts that gather information about the network before the scan proper begins. For example, scripts such as dhcp-discover and broadcast-dns-service-discovery use broadcast queries to collect information from network services.
During target enumeration, Nmap resolves the host specifiers you give it—DNS names, IP addresses, CIDR ranges, and so on—into a list of targets. The -iR option can be used to have Nmap choose random targets.
Host discovery establishes whether a machine is up. By default, Nmap performs host discovery first and then moves on to port scanning. If you only want host discovery without a port scan, use -sn. If you want to skip host discovery altogether, use -Pn: Nmap then sends no pings and treats every host as up.
Nmap performs reverse DNS resolution on the live machines identified by the ping scan. Under normal conditions this is done only for hosts that are up; the -R option forces it for every target.
Port scanning is one of Nmap’s core functions. Nmap sends requests to the ports of a live system and determines whether each port is open or closed.
Version detection identifies which service is running on each open port. Nmap compares the responses to its built-in probes against more than 6,500 service signatures. This is enabled with the -sV option.
Nmap can also identify the operating system of live machines. It holds a database of how different operating systems respond, sends its own probes to the target, and compares the replies with the entries in that database to determine the operating system. This is enabled with the -O option.
With the --traceroute option, Nmap can determine the route that packets take to each target.
Nmap includes the Nmap Scripting Engine (NSE), which contains a large collection of scripts. These scripts can be used for many tasks, such as gathering information about a target and detecting vulnerabilities. NSE is built on the Lua programming language and a standard library designed for network information gathering. Scripts typically run once for each port on each host that is discovered. You can run Nmap’s scripts with the --script or -sC options.
Nmap prints the information gathered during the scan to the screen. The results can also be saved in several different file formats.
Running sudo apt-get install nmap in the terminal installs Nmap. You can also download .rpm or .deb packages from the Nmap website and install those.

As Figure 2.1.1 shows, the sudo apt-get install nmap command makes installation straightforward.

To install Nmap on Windows, download the installer from https://nmap.org/download.html, as shown below.

Next, run the downloaded .exe setup file as an administrator.

Once installation is complete, you can run nmap.exe from the C:\Program Files (x86)\Nmap directory. The installer also adds Zenmap, Nmap’s graphical user interface.

Figure 2.2.3 shows nmap.exe running in the Command Prompt.

The Nmap and Zenmap tools shown in Figures 2.2.3 and 2.2.4 are also available on Linux, where you can launch them by running the nmap and zenmap commands in the terminal.
Host discovery is usually carried out by pinging the systems on a network. However, when the network is large, or when some machines do not respond to ICMP packets, other methods can be used. Nmap can scan a target network without pinging it at all, and it can optionally use TCP SYN, TCP ACK, UDP, and other probes. Whatever the probe type, the aim is the same: to work out from the response whether the machine at a given IP address is genuinely up.
To define targets, give Nmap the IP address or hostname of the target network. Instead of a single IP address, you can supply an address range. Nmap also supports CIDR notation—the /24, /18, and similar suffixes that follow an IP address or hostname. From that suffix, Nmap calculates how many hosts need to be scanned and scans them automatically. For example, entering 192.168.10.0/24 scans 256 hosts. The same works with a hostname: you could start a scan with www.priviasecurity.co.uk/24.
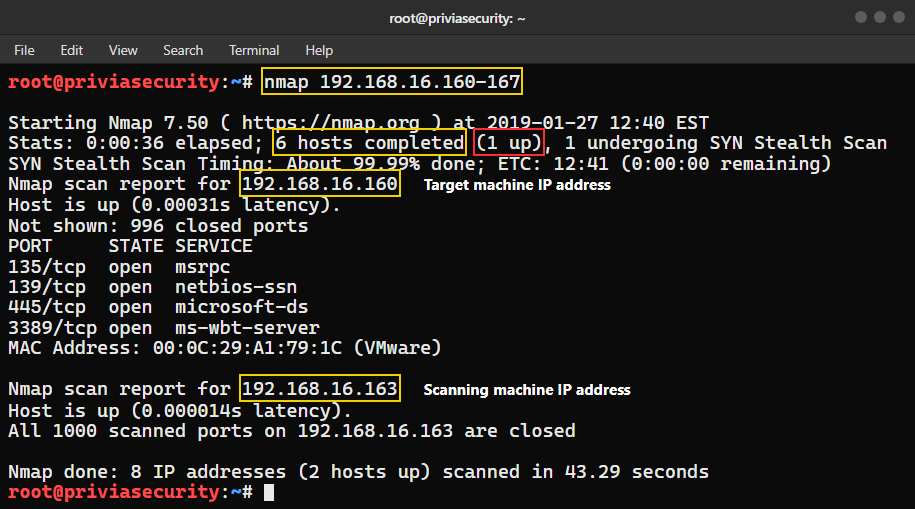
In Figure 3.1, Nmap is given an IP address range, and the scan covers every address within it.
This approach is common in large network scans. Save the hundreds or thousands of IP addresses you have been given to a file, then start the scan with the -iL option.

As Figure 3.1.1 shows, the -iL option follows the nmap command and points to a file containing IP addresses, which Nmap then scans.
Choosing Random Targets
To scan random IP addresses with Nmap, use the -iR option.
Excluding Out-of-Scope Targets
Defining out-of-scope targets is often overlooked, yet it prevents risky mistakes. IP addresses that must not be scanned are specified with the --exclude option. When there are many of them, save them to a file and use the --excludefile option instead.

As Figure 3.1.3 shows, the IP addresses given after --exclude are left out of the scan. Where there are several addresses to exclude, the --excludefile option can be used.
In Figure 3.1.4, the -sL option is used to list the IP addresses in a network to be scanned.

To scan several unrelated targets, list their IP addresses or hostnames separated by spaces, as shown in Figure 3.1.5.

Before a scan, you are usually given the organisation’s main domain. The scan can then be run against the IP addresses behind that domain.
The primary purpose of DNS is to resolve domain names to IP addresses, so DNS information needs to be researched first, as shown in Figure 3.2.1.

In Figure 3.2.1, the host utility on Linux is used to query DNS record types and obtain information about the domain’s name servers. Figure 3.2.2 shows a zone transfer check.

Figure 3.2.2 shows whether the zone transfer succeeded or failed. To check whether a domain’s IP address falls within the agreed scope, use DNS resolution, traceroute, and whois for the relevant IP address registrations.

As Figure 3.2.3 shows, scanning the target domain with the --traceroute option displays the intermediate IP addresses on the way to the target. Figure 3.2.4 shows information gathering based on an IP address.

In Figure 3.2.4, whois returns information about the target IP address.
DNS resolution matters a great deal in host discovery. Nmap performs DNS resolution for every IP address that responds to its host discovery probes. Four options control this behaviour:
-n: tells Nmap not to perform reverse DNS resolution on the IP addresses it finds. This usually shortens the scan.
-R: tells Nmap to perform reverse DNS resolution on every IP address it targets. By default, reverse DNS resolution is carried out only for hosts that are up.
--system-dns: by default, Nmap resolves IP addresses by sending queries to the name servers configured on your machine and listening for the answers, with many requests running in parallel to improve performance. This option makes Nmap use the system resolver instead. Older versions of Nmap also relied on the system resolver for IPv6 addresses.
--dns-servers: by default, Nmap takes its DNS servers from resolv.conf (Unix) or the registry (Win32). This option lets you specify your own. Using several DNS servers is faster, and because the requests can be spread across recursive DNS servers on the internet, it can also improve stealth.
Figure 3.3 applies these options to DNS resolution.

Figure 3.3 shows DNS resolution in action, with results obtained using the options described above.
The host discovery options let you determine whether targets are up or down. To do so, you need to check the responses to the probes sent to each machine.
A list scan is used to check the target IP addresses. It is a form of host discovery that lists the hosts on the specified network without sending any packets to them.

Figure 3.4.1 shows a list scan using the -sL option. Adding -Pn skips the ping stage so that the rest of the scan can still proceed.
A preliminary list scan helps you confirm which targets are actually being scanned. Another reason to run one is stealth: some scanning activity triggers IDS alerts, whereas a list scan shows which machines will be targeted without causing them. If the targets might notice the reverse DNS lookups, you can use the --dns-servers option to spread them across anonymous recursive DNS servers.
Nmap uses the -sn option to identify live hosts on a network quickly, reporting the IP addresses of the hosts it finds. This is known as a “ping scan”. No port scan is performed, although Nmap can still use its host scripts and traceroute probes. A ping scan is more intrusive than a list scan and returns the IP addresses and hostnames of the targets. Figure 3.4.2 shows a ping scan with Nmap.

In Figure 3.4.2, a ping scan is run with the -sn option. As the screenshot shows, no port scan has been carried out.
Scanning without ping means skipping host discovery. Every machine in the network is passed on to the subsequent stages in turn, as if it were up. Running host discovery across a set of IP addresses takes extra time compared with a no-ping scan. The -Pn option performs a scan without pinging, as shown in Figure 3.4.4.
--disable-arp-ping: host discovery on a local network normally sends ARP packets and decides from the replies whether a host is up. This option is useful on networks where a router answers all ARP requests on behalf of other hosts, making every target appear to be up in an ARP scan. It disables the default ARP scan, as shown in Figure 3.4.4.

--resolve-all: if a hostname target resolves to more than one address, all of them are scanned. By default, only the first resolved address is scanned.
--traceroute: traceroute runs after the scan, using information from the scan results to choose the port and protocol most likely to reach the target. It works with every scan type except connect scans (-sT) and idle scans (-sI). Traceroute sends packets with a low TTL (time-to-live) to elicit ICMP Time Exceeded messages from the intermediate hops between the scanner and the target host. Standard traceroute implementations start with a TTL of 1 and increase it until they reach the target. Nmap works backwards from a higher TTL instead and uses a caching algorithm to speed up the process.
The traditional way to check whether machines on a network are up is to send them ICMP echo requests and look at the replies. Whether a reply arrives tells you whether the machine is up or down. It is a simple and long-established host discovery technique, although many firewalls now block these requests. In Figure 3.5, the -sn -PE options specify an ICMP ping scan, while -R requests reverse DNS resolution for every machine.

The -PS option sends an empty TCP packet with the SYN flag set, by default to port 80. The flag signals an attempt to open a connection to the remote system. If the port is open, the target replies with a SYN/ACK packet; rather than completing the three-way handshake with an ACK, Nmap sends an RST and drops the connection. Either an RST or a SYN/ACK reply shows that the machine is up.

This host discovery technique uses the -PA option. It is similar to SYN ping; the only difference is the flag. A TCP packet with the ACK flag set is sent to the target, by default to port 80, and if the target is up it replies with an RST packet. It is useful when scans using -PS are being blocked.

UDP ping uses UDP packets to determine whether systems are up. It is enabled with the -PU option, which takes the same port syntax as -PS and -PA. By default it uses port 40125. The packets sent are usually empty, but because ports 53 and 161 are common services, protocol-specific payloads are sent to them. The --data-length option adds a random payload for all ports. The main advantage of this scan type is that it can get past firewalls and filters that only screen TCP ports.
Nmap uses ICMP packets in host discovery. It sends ICMP type 8 (echo request) to the target hosts and expects ICMP type 0 (echo reply) in return, but many firewalls block these requests. The -PE option sends an ICMP echo request; this is known as an ICMP ping. Live hosts can also be discovered with timestamp and address mask requests, using the -PP and -PM options respectively.

This scan type uses the protocol number in the header of IP packets. If no protocol is specified, Nmap sends multiple IP packets for ICMP, IGMP, and IP-in-IP. Whether a machine is up is determined from replies that use the same protocol as the probe, or from ICMP messages reporting that the target host is unreachable.
ARP ping is one of the most commonly used scans on local networks and is enabled with the -PR option. Nmap sends raw ARP requests and so learns the physical (MAC) address of the machine that corresponds to the target IP address.
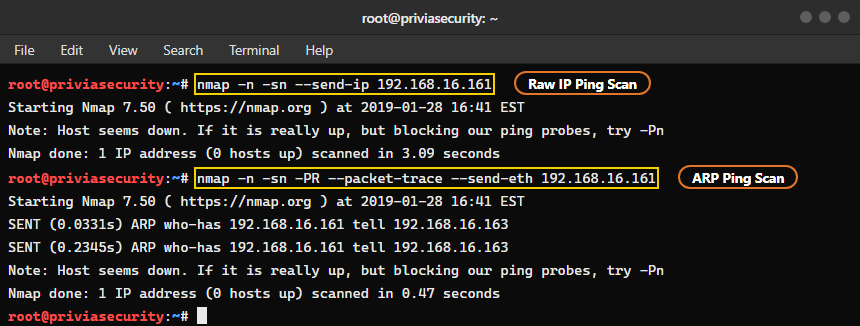
Figure 3.5.6 shows two example scans. In the first, the --send-ip option makes Nmap send IP-level packets even though the target is on the local network. This first example took 3.09 seconds. Because only one target was scanned, it finished quickly, but on a corporate local network with many machines the time adds up. The operating system does not give up on the host until it has sent three ARP requests one second apart. In the second example, the ARP scan completed in 0.47 seconds. Network administrators often block ping packets, but ARP requests and replies are generally not blocked. You can also hide the scanning machine’s MAC address during these scans with the --spoof-mac option.
This scan type uses the -PY option, which sends an SCTP packet containing an INIT chunk, by default to port 80. For example, -PY22,80 sends probes to ports 22 and 80. If a port is open, the target returns an INIT-ACK. Instead of continuing with a functional SCTP packet, Nmap replies with an ABORT and ends the association. These responses show that the ports on the target machine are open and that the host is up.
Nmap provides a number of options that make host discovery more effective. You choose them according to the type of scan you want to run. They are described below.
-v/--verbose
This option makes Nmap’s output more detailed, including additional information about each host.

--source-port <portnumber>
Firewall administrators often create special rules that keep DNS and FTP ports open. Source port manipulation exploits such rules and is one of the common techniques for bypassing a firewall.
--data-length <length>
This option appends random data to every packet and can be used with TCP, UDP, and ICMP scans. It is one of the methods used to evade many IDS products. Payload size can also act as a fingerprint: a Windows echo request carries 32 bytes of data by default, while a Linux one carries 56, so an IDS that judges the source by payload length may wrongly conclude which operating system the scanning machine is running.

--ttl <value>
Setting the outgoing TTL is used in IPv4 ping scans as a safety measure to keep the scan within the boundaries of the local network. Lowering the outgoing --ttl value also reduces the processing load on router CPUs if a routing loop is encountered.

Timing templates are preset combinations of settings that speed up a ping scan and the delivery of its results. They are selected with the -T option. There are six templates: paranoid (0), sneaky (1), polite (2), normal (3), aggressive (4), and insane (5).

--min-parallelism/--max-parallelism <value>
These options control how many targets are probed in parallel. The <value> sets the number to run at once.
--min-rtt-timeout/--max-rtt-timeout/--initial-rtt-timeout <time>
These options control how long Nmap waits for a response to each probe it sends.
The output options include -oA, -oN, -oG, and -oX. For example, -oX writes Nmap’s results in XML format.
--randomize-hosts
Using --randomize-hosts when scanning a network makes the scan less conspicuous, which helps avoid IDS and IPS systems. By default, Nmap scans the machines on a network in sequence, and some IDS and IPS systems can detect and block that pattern.
--reason
Default scan output shows whether a target port is open, but not why. With this option, Nmap explains which discovery probes the target responded to. For instance, during one run Nmap might record an ICMP echo reply as the response, while a second scan might receive an RST packet first and report that instead. To see in detail what kinds of responses the target does or does not give, this option is well worth using.

--packet-trace
With --packet-trace, Nmap shows in detail what it does during the scan. It prints every packet sent and received, including details such as sequence numbers, TTL values, and TCP flags.
-D <decoy1,decoy2,...>
Decoys are spoofed IP addresses used to hide the attacker’s real IP address. In Figure 3.6.12, the attacker’s IP address is 192.168.16.163, but the scan was run alongside spoofed addresses such as 192.168.16.138 and 192.168.16.2, given with the -D option. This makes it harder for the people monitoring the network to identify the attacker.

-6
Uses IPv6 instead of IPv4 addresses for the scan.
-S <source IP address>, -e <sending device name>
These options let you specify the source IP address and the name of the sending network interface for the scan.
Scanning a target effectively can take more than knowing every option. Success rates vary depending on which options you specify and how you combine them, as Figures 3.7a and 3.7b show.


You May Be Interested In These



We use a few cookies that are needed to make this website work, and they are always on. We would also like to set analytics cookies, to see which pages are useful; functional cookies, so that our live chat works; and advertising cookies, to measure our campaigns. We will not set any of those until you say yes, and you can change your mind at any time from the Cookie Settings link in the footer.
Choose the cookies you are happy for us to use. Strictly necessary cookies are always on; everything else is off until you turn it on.
These cookies keep the website working: they hold your security checks, your form submissions and the choice you make here. The site cannot run without them, so they are always on.
These let our live chat open and remember your conversation, and let the newsletter sign-up work. Switch them off and the chat window will not appear.
These tell us which pages are read and how people find us, so that we can improve the site. The reports are about groups of visitors, never about you personally.
These let us measure our advertising and show you our adverts on other websites, such as LinkedIn, Google and Meta. Switch them off and you will still see adverts, but they will be less relevant.


